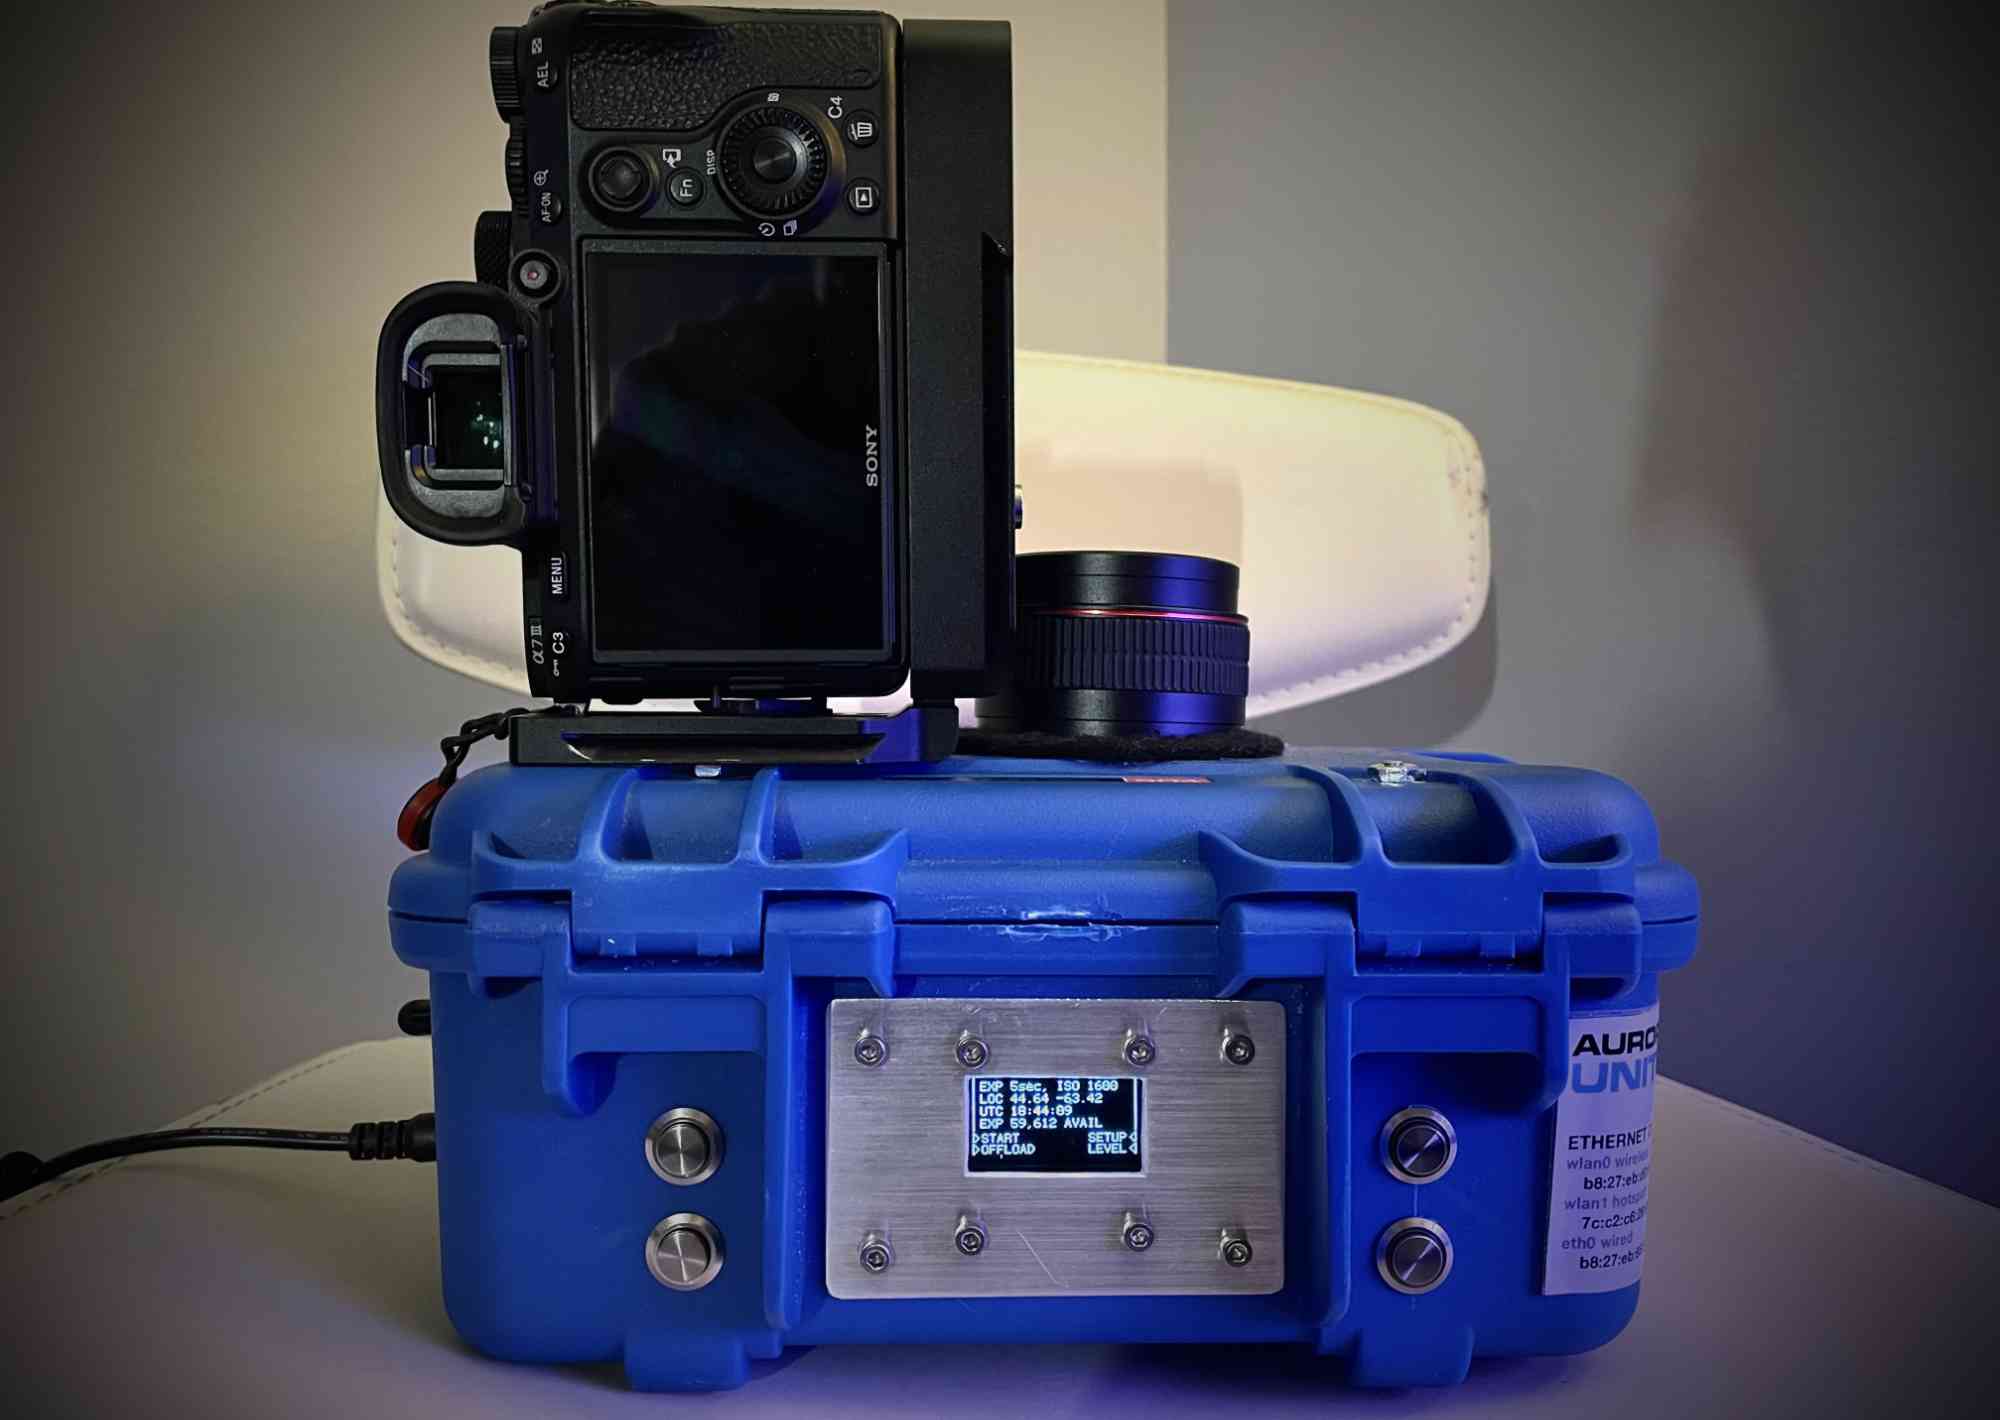
AurorEye is a portable, autonomous all-sky imager optimized for timelapse Aurora photography
AurorEye is designed to be carried with Aurora Chasers and capture time and location-calibrated, all-sky time lapses of auroral events for use in research and citizen science. Each unit uses off-the-shelf camera hardware and lenses. All control, telemetry, networking, and cloud upload functions are controlled by an integrated single board Linux computer. AurorEye can capture a full night of timelapse photos 1000-5000+ images at up to 4000x4000px RGB resolution.
AurorEye is evolving in software and hardware for cost effectiveness and squeezing as much performance as possible out of the off-the-shelf components. If you have lab capability for lens characterization, spectral response calibration for optical systems, please feel free to get in touch.
Explore the searchable timelapse video archive here
Specifications and Capabilities (November 2025)
| Metric | Value | Note |
|---|---|---|
| Physical | 200mm x 120mm x 220mm, 2kg | Case is stacked, modular 3D printed trays (power, control, imaging) |
| Support needs in field: | Camera Tripod with ballhead and standard arca-swiss mount | no supervision needed after 3 minute alignment and startup procedure |
| Imager | Commercial Bayer (RG1G2B) filter APS-C sized sensor (visible spectrum) | 3.9um pixel pitch |
| Field of View | 180-190 degree circular fisheye | |
| Aperture | f/2.0 | |
| Resolution | 4000x4000px | |
| Exposure Range | 1 – 30 seconds | |
| Onboard Controls | Glove-friendly physical interface buttons | OLED monochrome menu and information display |
| Remote Controls | Local Access Point wifi for control by phone or similar device | Controllable remotely via VNC access or Local Network if in Wifi/internet range |
| Image offload | Cloud service upload when in WiFi/internet connected area | (i.e. on return to home base) |
| Power and battery life | LiFePo4 battery, 75Wh, 42Ah capacity 4S1P | 10 hours at 10degC, >7h @ -20degC |
| Positioning, Timing, and Orientation | Integrated GPS, compass and accelerometer | +/-1sec timestamps, +/-100m position, +/-0.5deg in zenith alignment |
| Setup Assistance | Levelling and alignment interface | Exposure settings interface |
| Image Data types | 4000x4000 JPG, 8 bits per pixel, Bayer RGB, 100,000+ images | 2000x2000 TIF, 12 bits per pixel, raw counts, Bayer RGB (Bayer-binned 2x2), 20,000+ images |
| Extendability | Python-based software | additional stacked modules (i.e. larger battery, additional specialized camera) |
| Cost | Hardware: approx CAD$2500 | Assembly time: 3-5 days |
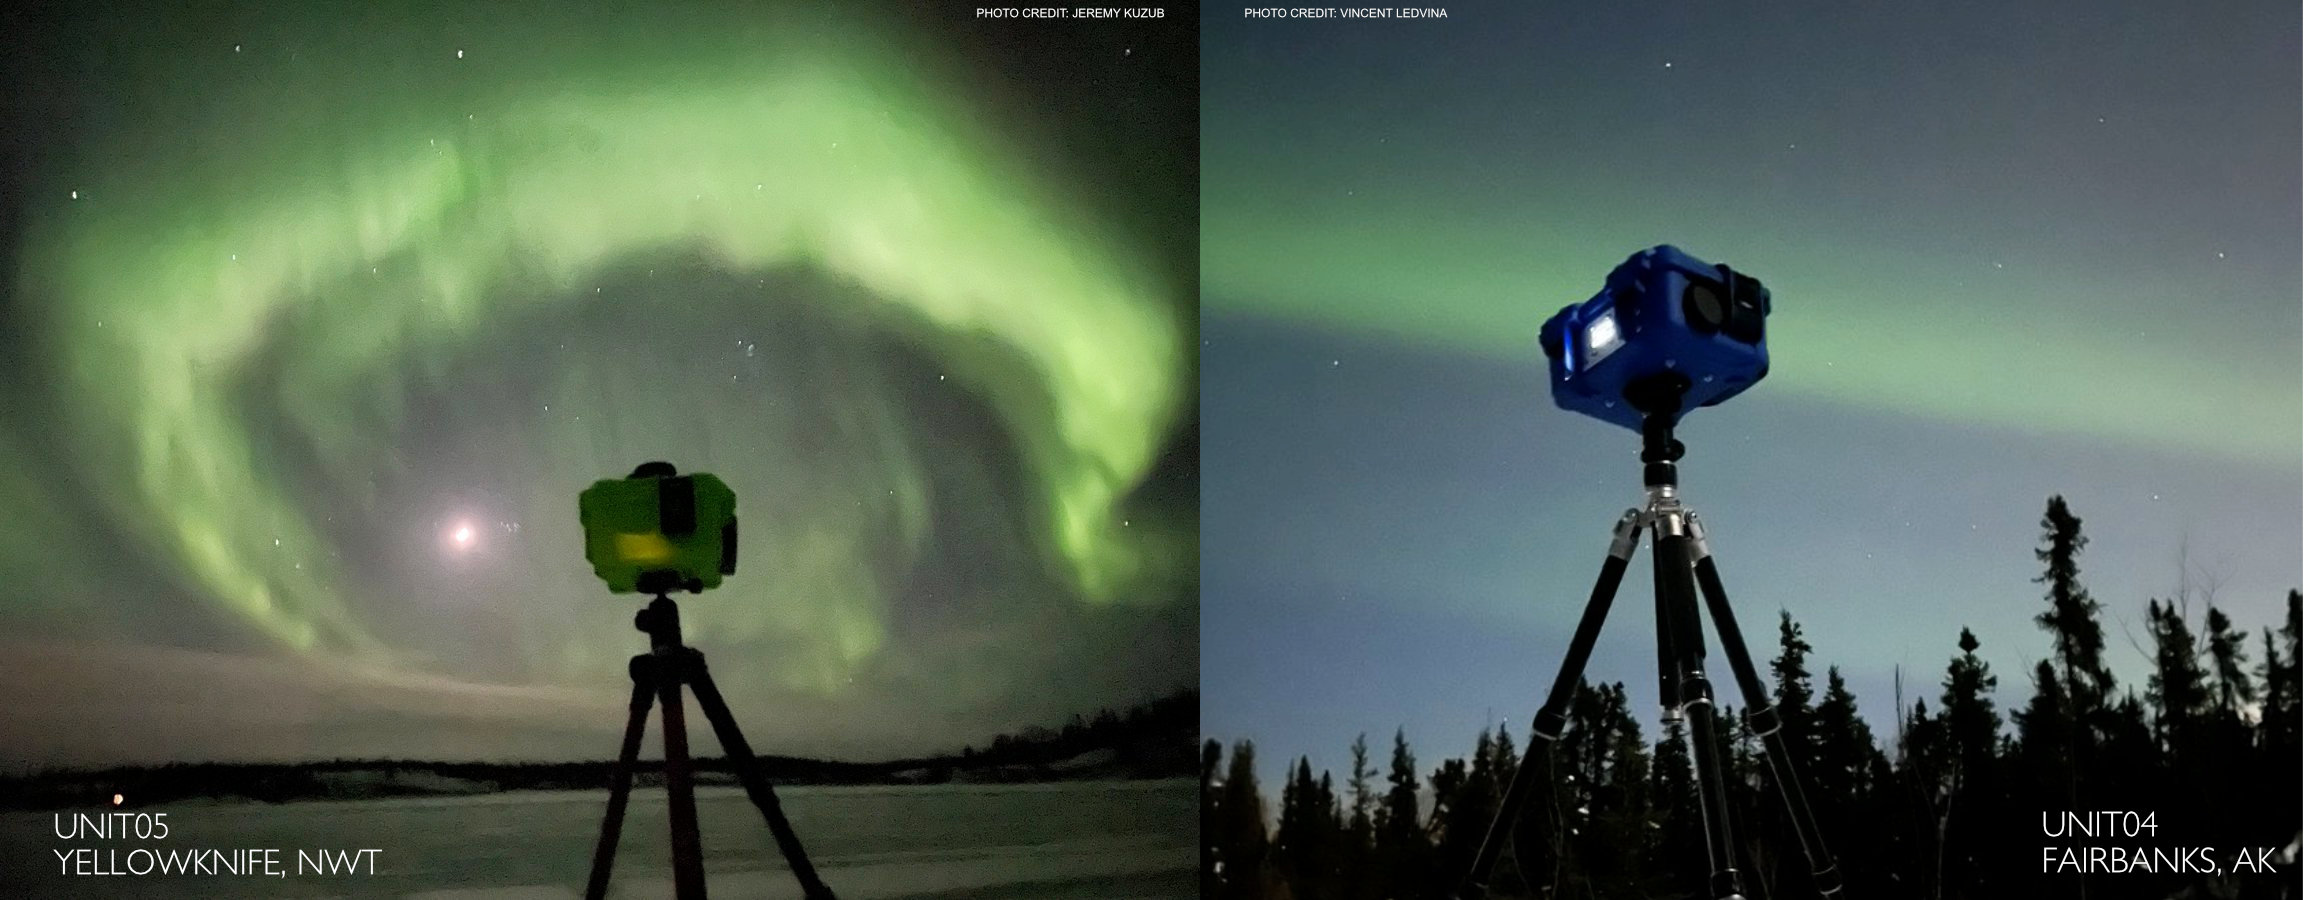
Locations where AurorEye units have captured data and list of Operators
AurorEye Units have campaigned in these locations, but not yet simultaneously. The goal is to have multiple deployments to Aurora Chasers and simultaneous all sky timelapse imagery of aurora
Operators
- UNIT01 - Retired - CANON M-Series - test article
- UNIT02 - Retired - CANON M-Series - test article
- UNIT03 - Retired - CANON M-Series - data collected in Whitehorse, YT, Dawson City, YT
- UNIT04 - Retired - CANON M-Series - Jeremy K, Ottawa, ON, September 2022 - March 2023, data collected in Edmonton, AB, Yellowknife, NWT
- UNIT04 - Retired - CANON M-Series - Vincent L, Fairbanks, AK, Mar-May 2023, Data collected in Fairbanks, PFRR
- UNIT04 - Retired - CANON M-Series - Andy W, Fairbanks, AK, April 2023
- UNIT05 - Retired - CANON M-Series - Jeremy Kuzub, Halifax, NS, Mar-Apr 2023, data collected in Yellowknife, NWT and Nova Scotia
- UNIT05 - Retired - CANON M-Series - Justin A, Manitoba, Canada Jan-Aug 2024
- UNIT05 - Retired - CANON M-Series - Donna L, Manitoba, Canada Sep 2024-April 2025
- UNIT07 - Retired - CANON M-Series - Vincent L Fairbanks, AK, Jan 2024-April 2025
- UNIT09 - Destroyed(!) - CANON M-Series - during May storm in Jasper, AB, Jan 2024 - May 2024
- UNIT10 - (mini) - Jeremy K 2024-Present
- UNIT11 - Retired -Jeremy K2025
- UNIT12 - SONY ZV-E10 - Vincent L, Fairbanks, AK, November 2025-
- UNIT14 - SONY ZV-E10 - Jeremy Kuzub, Halifax, NS, 2025-
- UNIT14 - SONY ZV-E10 - Alysa F., Thompson, MB, April 2026-
- UNIT15 - SONY ZV-E10 - Donna L, Manitoba, Canada (planned) 2026-
- UNIT16 - SONY ZV-E10 - Stephen V, Otago New Zealand, 2026
- UNIT17 - SONY ZV-E10 - Ian M, Otago New Zealand, 2026
Watch the 2021 AGU presentation
Timelapse Archive
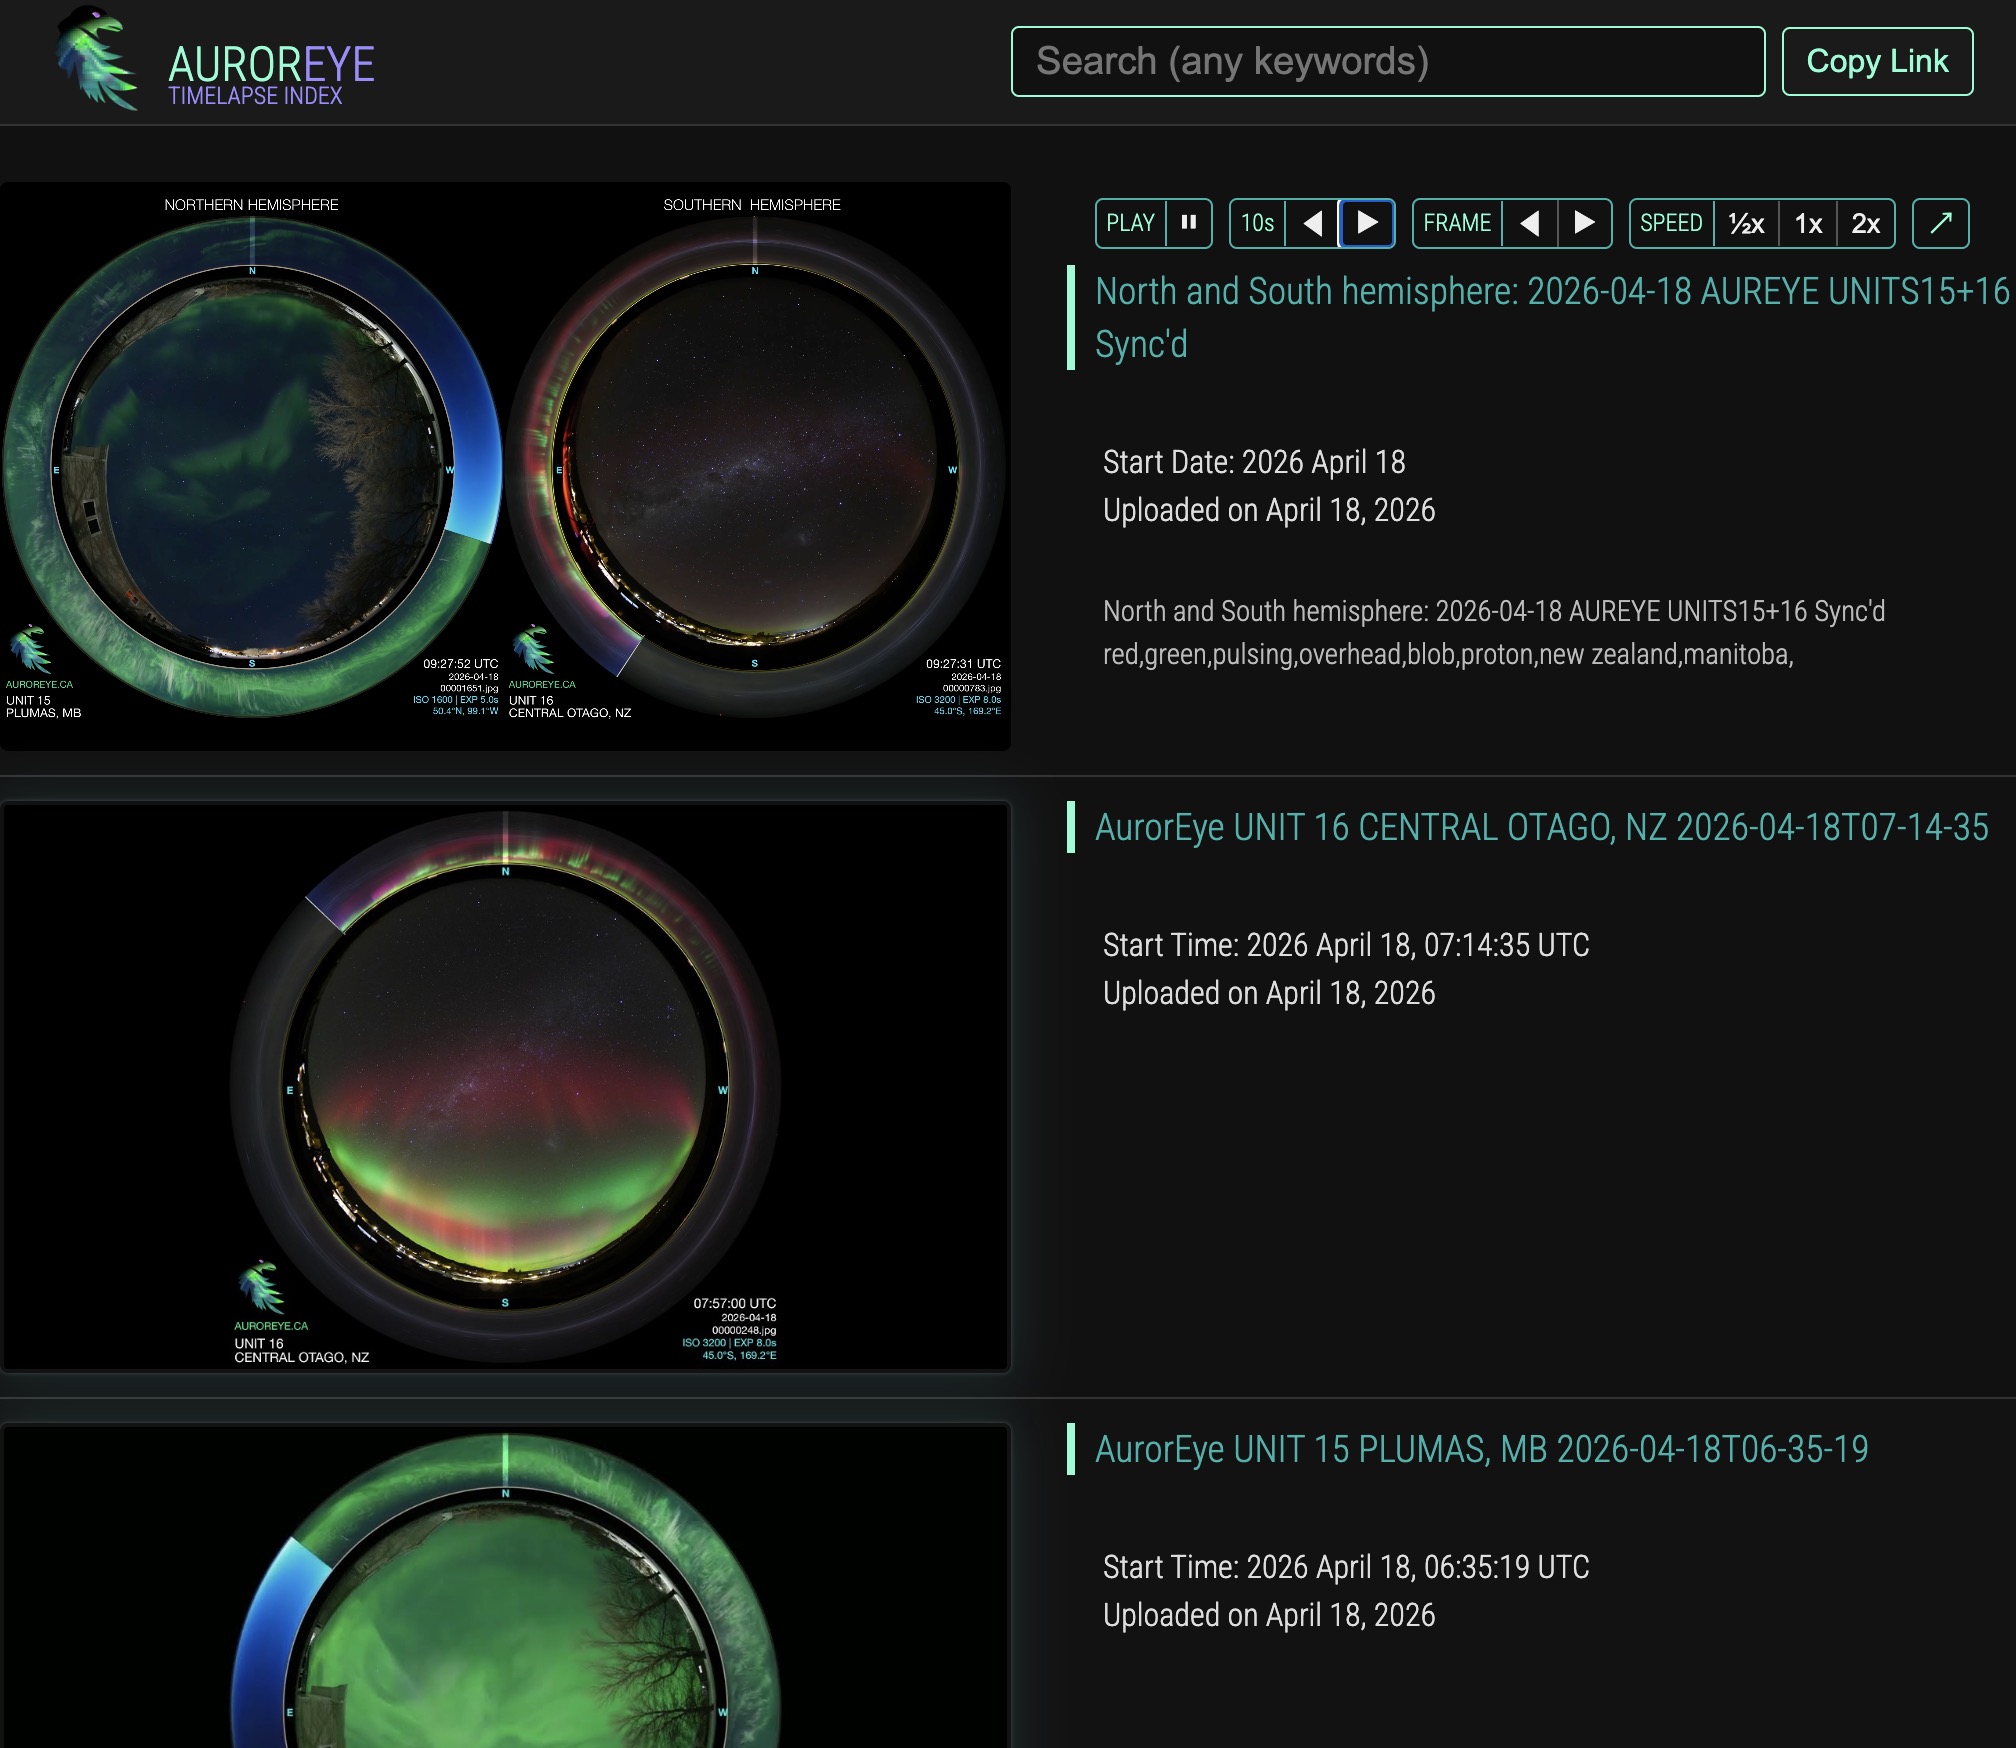
Videos are shared on YouTube. The AurorEye Timelapse Index page wraps these with additional search and playback controls. If you are a student, citizen, scientist or research interesting in the content of these timelapses, please get in touch at jeremy@jufaintermedia.com
LATEST UPDATES
Paper Preprint: Smartphone Carrier Phase TEC: A Study Across Ionospheric Spatio-Temporal Scales
ESS Open Archive preprint, Nina Servan-Schreiber, Vincent Ledvina, Joshua L. Semeter et. al.
"This study explores the potential of dual-frequency smartphones as accessible tools for citizen science in ionospheric research." A subset of this GNSS data was collected with a co-located AurorEye to test correlation between visible green aurora and the GNSS signal.
Sony sensor Behaviour

AurorEye right now is designed for capturing motion, morphology, and context with time and location stamps. Moving towards some sort of light intensity measurement in the future would be useful, and means really understanding the sensor behavior.
One example is this: in some sequences much more than others, the JPG captures from the Sony sensor show what can be termed "blackpoint jitter". This can be seen in the boosted sample of two consecutive frames above. In analysis of JPG output, it seems to be a variance in the Red and Blue channel noise versus the green channel, and can be seen in iso1600-6400 and exposures 2-15 seconds. This jitter also appears in developed ARW files, so is not a exclusively product of an attempted white balance or black level correction by the Sony ZV-E10. Amp glow can also be seen as a gradient in the bottom of ARW images when exposure over-boosted. In some sequences using JPGs a jitter in the colour balance can be seen in timelapse, notably when the scene is very dark (clear sky) or has few details (fog or overcast).
This informs how any data from the AurorEye images should be used when shooting with JPG on the Sony camera. Black level balancing using the original ARW CFA DN counts is being investigated. One approach may be to take a sample area of the corner of the frame (which is a proxy for a darkframe) determine the mean RGB values in Bayer space, and use these as the black level rather than the fixed 512.
A more detailed analysis and mitigation can be read here (PDF)
Hardware and Software Development: Lens calibrations, RAW imager data, and the Work In Progress
AurorEye aims to strike a balance between ease of use and data quality. This often comes down to balancing key elements of the workflow against one another. There are a lot of tradeoffs to consider and a few needles to thread. Recently the goal of a calibrated imaging pipeline has been the focus of software development. This means understanding how every pixel intensity readout of an image can be traced to real-world location and intensity (as much as possible).
This pixel-to-real-world pipeline encounters two main 'transforms': Lens distortion and the camera sensor:
Lens Model
Recently Michael H., a fellow member of Aurorasaurus Ambassadors' group (and physicist contributing hardware and software to aurora observation analysis science) has generously used his software tools to align target stars as imaged through the AurorEye fisheye lens. This "plate solving" is a common part of astrophotography workflow, but is often done for smaller, rectilinear fields of view (i.e. more like what we see). A 190 degree fisheye lens can be harder to characterize, especially with tools like OpenCV. Michael's experimental software calibrates against known stars and their alt-azimuth position. This allows us to make a best-fit polynomial model of the lens from pixel position to altitude+azimuth for any pixel (progressively less accurate towards the extreme edges of the frame).
Once a pixel on the AurorEye image can be mapped to an Altitude+Azimuth in the real world, we have the opportunity to model slant distance to auroral features (i.e. from the camera lens to the feature in a line through the atmosphere, using an assumed feature altitude). With 2+ cameras, we can look at triangulation of feature heights. Thanks Michael for your contribution!
Sensor Model
When we rely on the camera's internal image processing, we have a 'black box' problem - we don't know exactly what was done to the raw pixel readout data to end up with a final frame. Everything from gamma curves to black levels to noise reduction, and colour space transforms. However we do get a very compact, high resolution, human-perception-like image, great for uploading to cloud storage and for identifying morphology.
However we lose traceability - the ability to match a pixel's RGB values to real world intensity. We also lose dynamic range, and the ability to later reprocess the images to the fullest extent. Our decisions are "baked in".
This came to light recently in observing that Sony cameras have "baked-in" black level modification that takes place per channel, likely before colour-space transforms and non-linear intensity curves are applied. Because these are applied per channel and per frame, there can be an edge case in dark frames where the apparent black level colour balance jitters. This is reduced by choosing appropriate camera settings but is an example of why we are moving to work with raw sensor readout data.
RAW images are generally a proprietary format in consumer large-sensor cameras. Proprietary lossy compression is often applied to get a factor of 2 reduction in file size, however these file sizes can still be 5-10x larger that an equivalent dimension 8-bit processed image, making upload from remote locations an unreasonable bandwidth burden.
The approach AurorEye development is taking is to remove all image processing decision-making from the camera, and to divide that processing between the computer onboard the AurorEye and the cloud+workstation processing pipeline that downloads the images (i.e. the next day).
On the AurorEye in real time:
Goal: We want to preserve RAW sensor data but also want to compress it for upload to the size of a JPG - at least 5x smaller than the proprietary RAW file format. The approach we are taking is:
- Extract raw Bayer array intensity values at 16 bits greyscale from the proprietary camera raw images
- Crop and mask away the areas that are not in the image circle (so we are not compressing shot noise patterns)
- 2x2 Bin the Bayer array data from 4000x4000 to 2000x2000 (colour array-aware): this is reasonable as we have enough resolution that shot noise becomes a dominant compression inhibitor in dark areas - this averaging will improve the signal to noise ratio of the resulting image, and further reduce the impact on file size of trying to compress shot noise
- Fast lossless compression into a TIF container format - we can achieve around a 5x file reduction size, in line with a 8-bit jpg, but with raw sensor data at 12 bits per pixel. At a cadence of 2 seconds per image using a reasonable subset of the on board computer's CPU and RAM resources
On the workstation side, offline:
- De-Mosaic the Bayer image to recover RGB: the right algorithm has to be chosen, and there are many that trade-offs to consider. Demosaicing is a perceptual exercise and an estimation of "missing" data. This is also why we 2x2 bin the data on the camera - we don't need a full sensor resolution if that resolution is partly an demosaic estimate
- Assign black levels, color calibration matrix, white balance, gamma curves, saturation, contrast, and noise reduction (some of these are done before and some after de-mosaic
- Save result as 16-bit or 8-bit RGB PNG files for timelapse processing
- Retain the original RAW sensor data for future reprocessing - ths way we have ground truth pixel values as part of the AurorEye data set
Summary: This is a new camera pipeline:
- Full control over image processing
- 12 bits of intensity data per pixel
- Calibrated lens geometry
- No hardware changes needed - just a software update to deployed units
Paper: Unresolved Questions in Subauroral Science Exploring Key Challenges in Physics and Chemistry
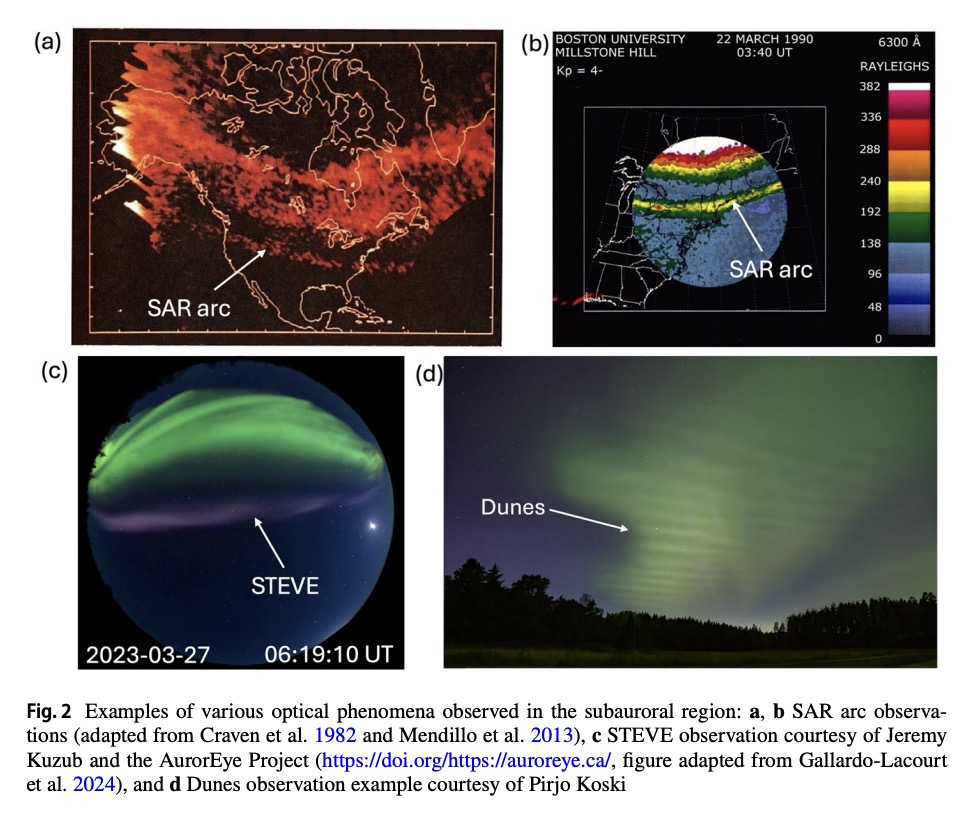
"The subauroral region, located equatorward of the auroral oval, is a highly dynamic and complex interface between the magnetosphere, ionosphere, and thermosphere."
This region coincides with a larger population of citizen scientists / participatory researchers. The opportunities and successes of using their observations in the subauroral region are covered, including the use of portable instruments including AurorEye and others. The paper outlines the edge of what is understood about these phenomena and how research efforts are being directed to address these unresolved questions.
Paper: Citizen Science in Space and Atmospheric Sciences: Opportunities and Challenges
Dr. Maxime Grandin, Vincent Ledvina et. al. This paper presents an overview of citizen science collaboration in aurora research.
They are part of the The ARCTICS ISSI Working Group aims at coordinating the citizen science efforts in space physics and aeronomy at international level. It has been great to work with this group, as the knowledge exchanged extends to investigations, instruments, and tools citizen scientists can develop for the future. This helps inform the development path of projects like AurorEye.
Presentation: Dr Eelco Doornbos talk on the SpaceWeather Timeline Viewer
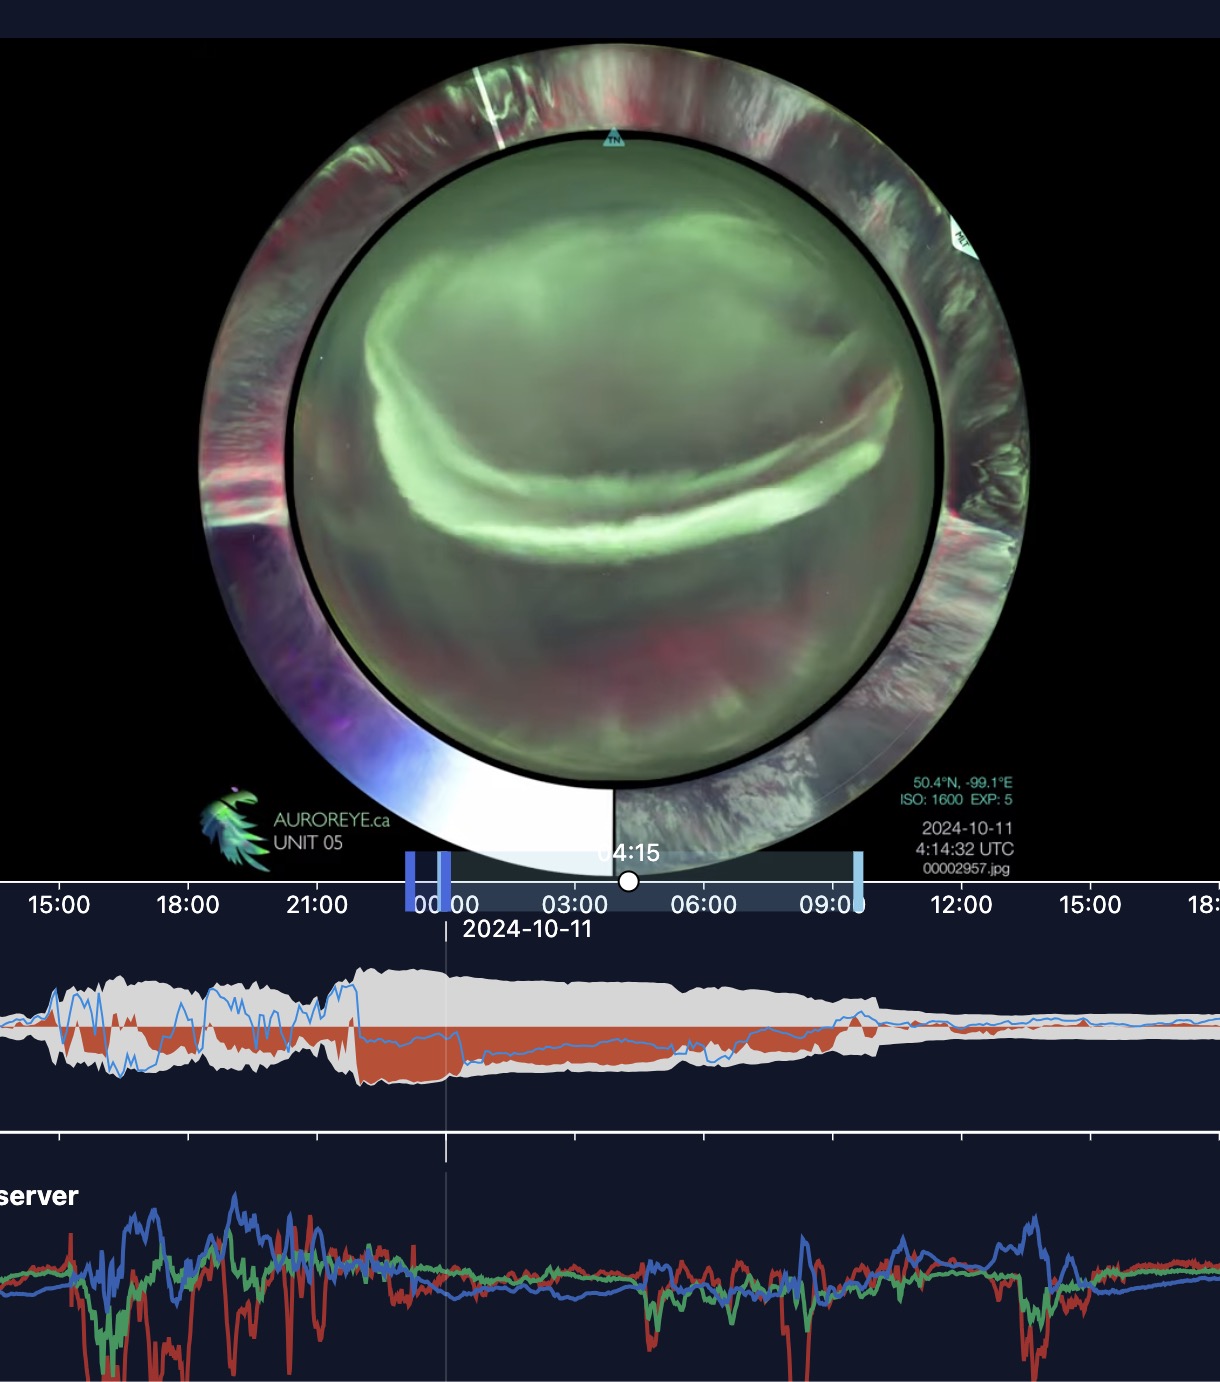
Dr. Eelco Doornbos of KNMI is a space weather scientist at the Royal Netherlands Meteorological Institute. On November 14, 2025, he presented to the Aurorasaurus Ambassadors a tour of the Space Weather Timeline Viewer, a tool for space weather data visualization. The web app also includes synchronization with select AurorEye timelapses.
You can try the Timeline viewer in AurorEye Video sync layout mode here
Presentation: High Latitude STEVE during quiet geomagnetic conditions (Talk by Dr. Bea Gallardo-Lacourt)
Dr. Gallardo-Lacourt and Jeremy K provide a talk to the Aurorasaurus group that outlines the research physics and the citizen science collaboration
The paper by Dr. Gallardo-Lacourt et. al. can be read for free at AGU
Hardware: Upgrades in UNIT 11 and later
Aside from the AurorEye mini (UNIT 10) prior units used Canon M-series cameras because of their compact format, good sensor, and some quirks in their firmware that allowed the use of "timelapse burst mode", which reduced the blackout time between frames to almost nothing. However these cameras are discontinued, and it was time to explore an upgrade to the camera and power system.
Testing led to the use of Sony APS-C cameras. The 1.5x crop factor is preferable to the canon 1.6x, allowing the whole fisheye image to be on-frame. The Sony cameras also have a key advantage of fully electronic shutter, meaning future AurorEye units have no moving parts that can wear out. Sony's also start more cleanly when powered up directly, reducing the need for some external power switching systems.
A smarter battery was used with higher capacity and USB-C passthrough charging, further reducing power system complexity. An additional LCD displaying battery status is a nice bonus that deserved its own window through the AurorEye case.
The internals were also moved around so that the camera and lens can sit deeply in the case, and the result is a more portable and robust package, especially for airline travel. One tradeoff is an increase in blackout period between frames. There are also some quality of life improvements, such as a pivoting mount for the computer, allowing easy access to all ports. Overall the system is easier to manufacture, potentially longer lasting (no moving parts) and a bit more future-proof.
One feature in all AurorEye cameras has been the mounting of accelerometer and magnetometers to the camera, not the case. This eliminates the need to make the camera mount stiff and tightly aligned with the camera to ensure proper pointing north and to the Zenith.
Outreach: Planetarium Dome Show using AurorEye timelapses captured by Citizen Scientists
The Urania not for profit planetarium in Postsdam, Germany is showing a 7-minute aurora montage show on its dome theatre screen, driven by Zeiss projector. For this application the AurorEye footage was downsampled to 3072x3072 with some inspirational music. Were are now exploring collaborations with other planetariums. Please get in touch if you would like to explore using AurorEye captures in your planetarium or dome projection system for education.
2024: A Year of Amazing Captures by AurorEye Citizen Scientists
I am grateful to be able to work with amazing Citizen Scientists who have operated AurorEye units in Alaska, Manitoba, Alberta, and Nova Scotia this year, capturing both of the severe geomagnetic storms this year. Thank you!

AurorEye integrated into the Space Weather Timeline Viewer
A big wishlist item has been aligning the time-stamped AurorEye data with other instrumentation like SWARM satellites and magnetometers to see correlations on a timeline. Dr. Eelco Doornbos has done just that, by adding AurorEye YoutTube channel timelapses with the Space Weather Timeline Viewer project, a flexible, broad reaching web app that can present a range of time series data in configurable views. We collaborated on a standard metadata format, and potentially other YouTube-based videos can synchronize with the SWTLV. Check out some samples
- May 11, 2024 major storm
- October 10, 2024 major storm
- March 20-24, 2024 storms
- August 10 and 28, 2024 storms
AurorEye sees
"Quiet STEVE", updates at AGU2024 in Washington, D.C.
On March 27, 2023, AurorEye unit operated by Jeremy Kuzub captured an unusual STEVE-like arc near Yellowknife, NWT, Canada. Dr. Bea Gallardo and collaborators aligned this sighting with other instrument readings (TREx imaging network, magnetometers, SWARM satellite readings, SuperDARN radar network) to demonstrate that this type of STEVE-like broad spectrum thermal emission may require revised explanations for how and when STEVE like emissions form. See the letter "Unexpected STEVE Observations at High Latitude During Quiet Geomagnetic Conditions" in the AGU Geophysical Research Letters here.
AurorEye will also be represented at AGU by PhD Candidate Vincent Ledvina as a poster at AGU2024.
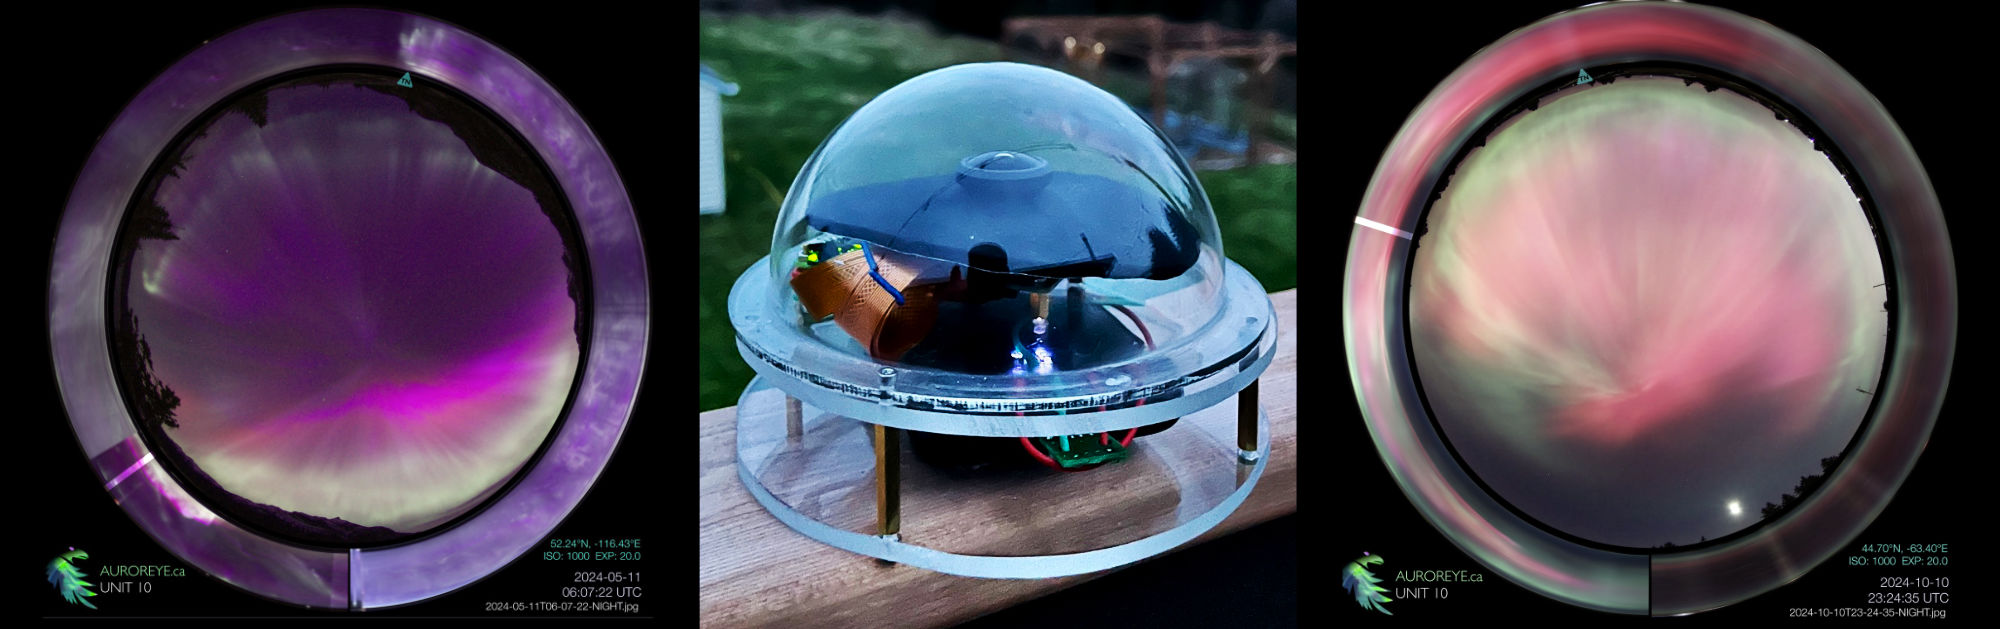
AurorEye Mini, a tiny, low cost prototype that's been across Canada
At AurorEye's heart is a 24mm, 24MP sensor, and all the other design considerations are to support that sensor. However, can we go smaller and cheaper?
The AurorEye mini uses the Sony IMX477 (RPI HQ Cam) is an 12MP 7.9mm sensor - this means the pixel size is about 1.55μm vs 3.8μm for the APS-C sensor, or about 16% the size, or about 2.5 stops less light for a given lens f-aperture, and decent exposure is around 10-20 seconds for general aurora capture.
Using a RPI Zero 2W, AurorEye mini can run all night with a small lithium ion battery pack and report to the local WIFI network with a hosted site. With a 256GB micro SD card, it can store around 100 8 hour nights of imagery at high resolution (2000px square). Because the components are so small, the whole unit fits inside the acrylic weather dome.
So far the design has been deployed by leaving it on the roof of the car and other rough and ready locations. The cost of this configuration is under CAD$250. A fixed installation also seems like a good option. The software is entirely different than AurorEye, but the same workflow with Davincii Resolve Fusion works, and two severe geomagnetic storm timelapses are available here as UNIT 10
Free PDF: Aurora Handbook for for Citizen Science
The Aurora Handbook for Citizen Science is available for free download. The ARCTICS (Auroral Research Coordination: Towards Internationalised Citizen Science) working group, sponsored by the International Space Science Institute (ISSI) in Bern (Switzerland) since last year, recently released its Aurora Handbook for Citizen Science, together with an Aurora Field Guide for Citizen Science.
There is a section about AurorEye in the Handbook as an example of how any citizen scientist can collaborate, participate, and contribute. The Aurora are something we can all share from our unique perspectives, I am grateful to know some of the amazing people that contributed to this Handbook and Field Guide. Give them both a read!
A Reminder why we do this: Citizen Science
These photos were being posted in Alberta Aurora Chasers' Facebook group, and were assembled into an animation of flying under the aurora. Citizen Science has a pretty broad definition, including data visualization and image processing in novel ways.
Deployment plans for 2023/2024

Deployment highlights from 2023:
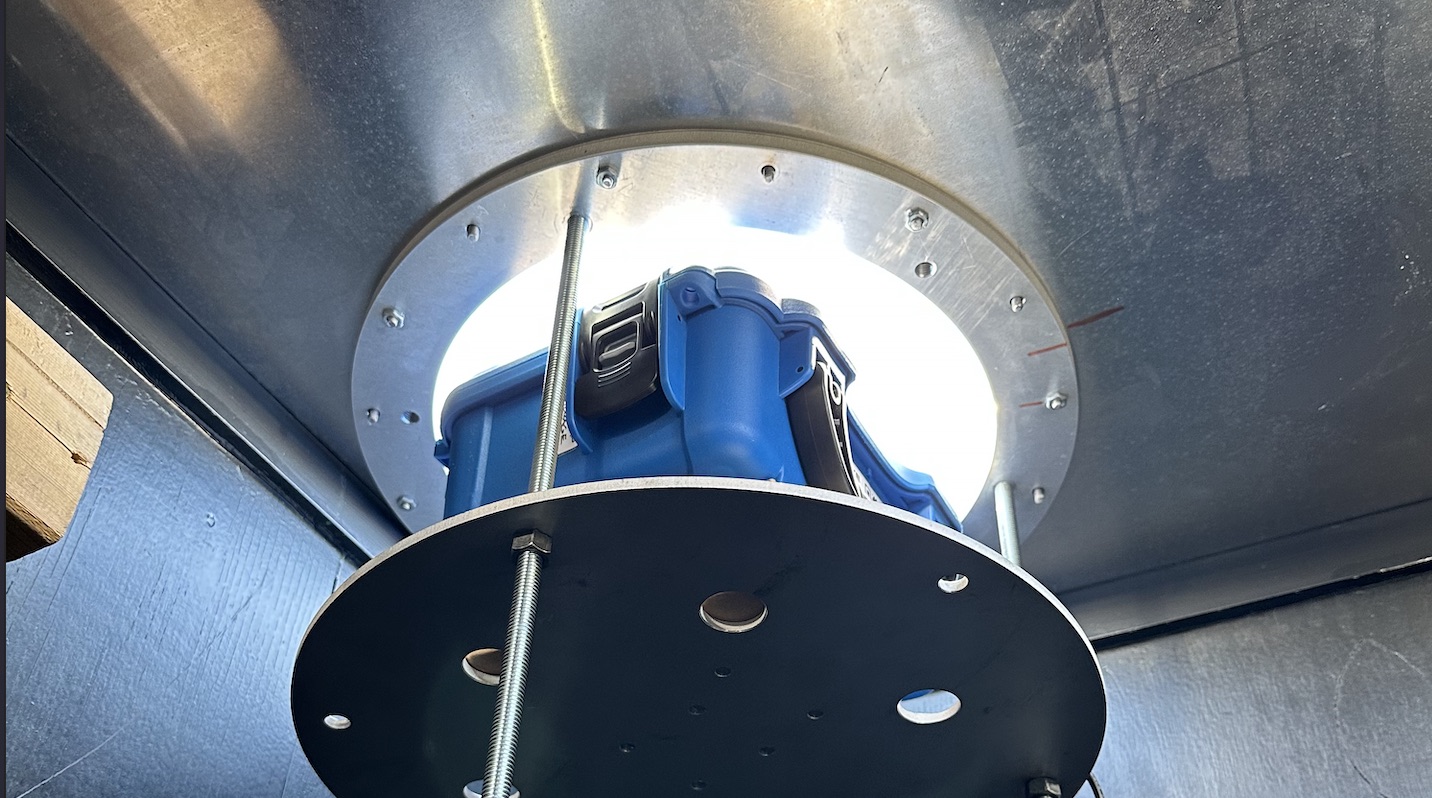
- Tethered testing under a dome at Poker Flat Research Range (Thanks to Vincent Ledvina and Dr. Donald Hampton)
- Deployment to Yellowknife in harsher winter conditions (-20degC)
- Testing at lower latitudes, including Nova Scotia, during Kp8/G4 geomagnetic storm conditions
For Spring 2024
- Deployment to Alaska
- Deployment to Yellowknife
- Deployment to Manitoba
Further plans include geometric calibration of the sensor and lens combination to allow projection onto a map and potential to combine these with images from other ASI networks.
Data Update:
April 30, 2023
AurorEye timelapse videos are now hosted on a dedicated YouTube channel at 4K resolution with radial keograms.
Visit the timelapse archive at YouTube
If you are a student, citizen, scientist or research interesting in the content of these timelapses, please get in touch at jeremy@jufaintermedia.com
Why not a dedicated, cloud powered video server and custom React front end and so on?
YouTube is the cloud based, free, video hosting service that suits AurorEye best at this time. Setting up our own cloud server for these summary 4K timelapses would be potentially costly (if there is a sudden rise in views) and we would have to reinvent the video playback wheel. Youtube offers some great advantages like visibility, bandwidth, playback speed, multiple resolutions, and linkable chapter markers for specific auroral events within timelapses.
Deployment Update:
April 17, 2023
Unit 05 - some new tricks and good conditions
Unit 5 was built to rely on its wireless access point and web app for Operator control. This worked well, allowing the Operator to setup and then monitor status, logs, and images from a distance, and even back in the vehicle while warming up. Clear skies in Yellowknife allowed capture of SAR/STEVE, red aurora of the kp8 March 23/24 event, and several sub-storms and large formations ("Churns"). This data was captured within 20-30km of the AuroraMAX ASI, which could allow comparison of data captured and some parallax experiments.
Unit 04 - Fairbanks and PFRR
Unit 4 arrived in Fairbanks in good order and was tested by two Operators (see Deployments section for credits)
Unit 04 also had the opportunity to be hosted under one of the dome at Poker Flat Research Range, demonstrating remote control and multi-sequence capture over two nights. The unit used its external power option and tied to the local WLAN network allowing remote operation via a VNC and the terminal interface.
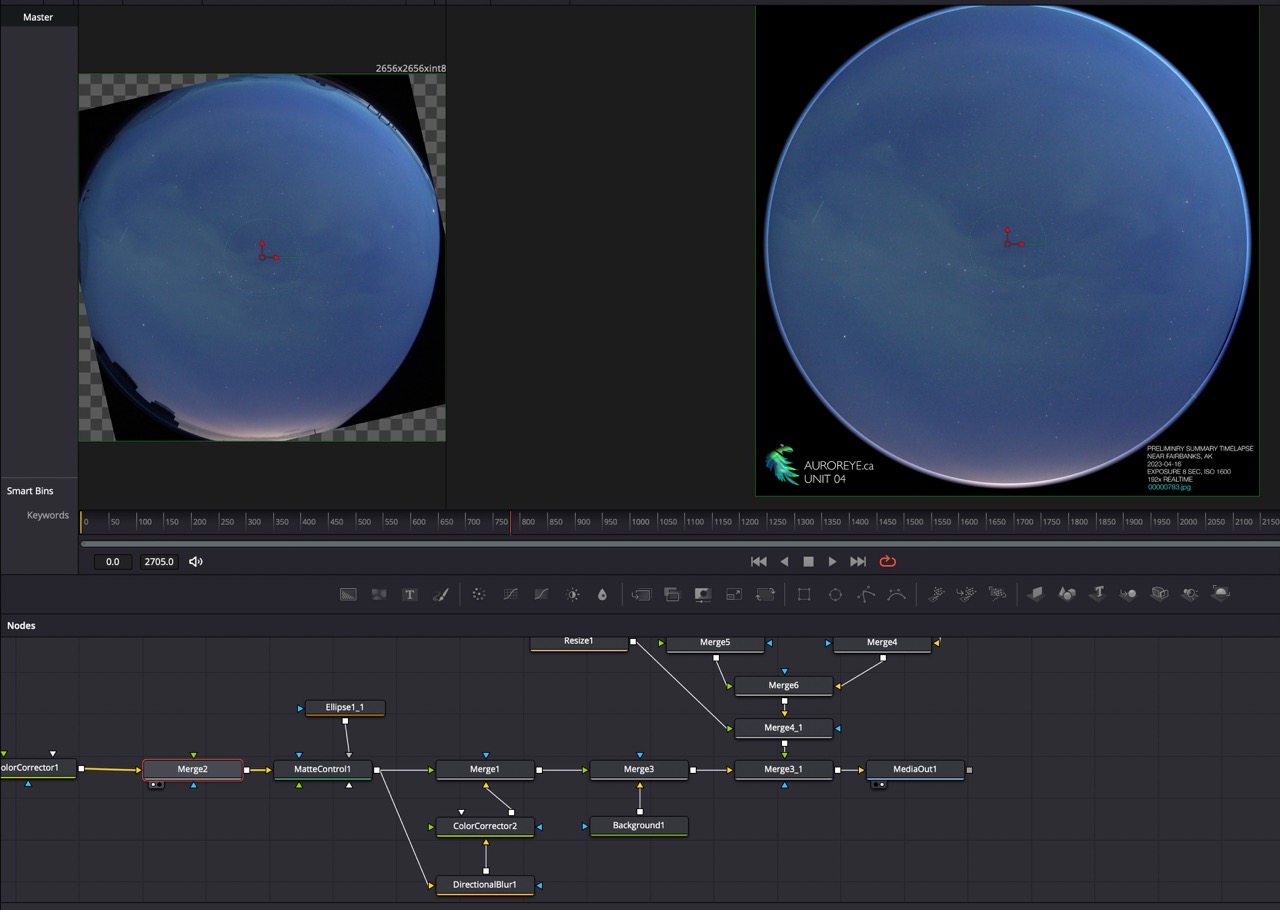
Video processing workflow using free video editing software
Using the free version of Davinci resolve allow image processing pipelines from image sequences to 4K and 8K timelapses using the Fusion node network system. This promises flexibility and rapid iteration when combining data before committing to a coded solution
Deployment Update: March 28, 2023
This is an interim update with data still being analyzed. Units 04 and 05 were both deployed for testing in northern latitudes. More to come, but this is the beginning of testing with Aurora Chasers.
Development Update: March 2023
The theme of this month's update is "Ship it": we are getting some units out to the field for testing:
Unit 04 to Fairbanks
This should be in good hands (with the aurora chaser who will be operating it, not the journey through the mail). This test campaign has a few milestones:
- Overall user experience: does the unit work well enough to not burden an aurora chaser on their chase, while capturing the data it was designed to capture?
- Survival through the mail - special packaging is needed for electronics: modular Polyethylene foam extrusions (aka pool noodles) have the density and impact absorption needed for shipping and are much easier to shape around electronics. Hopefully they will do the trick
- Survival through international customs - shipping science equipment without incurring extra fees or customs scrutiny
- Home base functionality - can the user set up the AurorEye unit on their local network successfully like any internet connected household device, using the in build wireless access point setup tool?
- Field functionality - can the unit be set up and capturing imagery with low overhead?
- Cloud functionality - can the unit successfully offload a night's image sequences to the cloud storage facility
- Robustness - can the unit stand up to the unknown unknowns of aurora chasing with a new user?
Unit 05 to Yellowknife
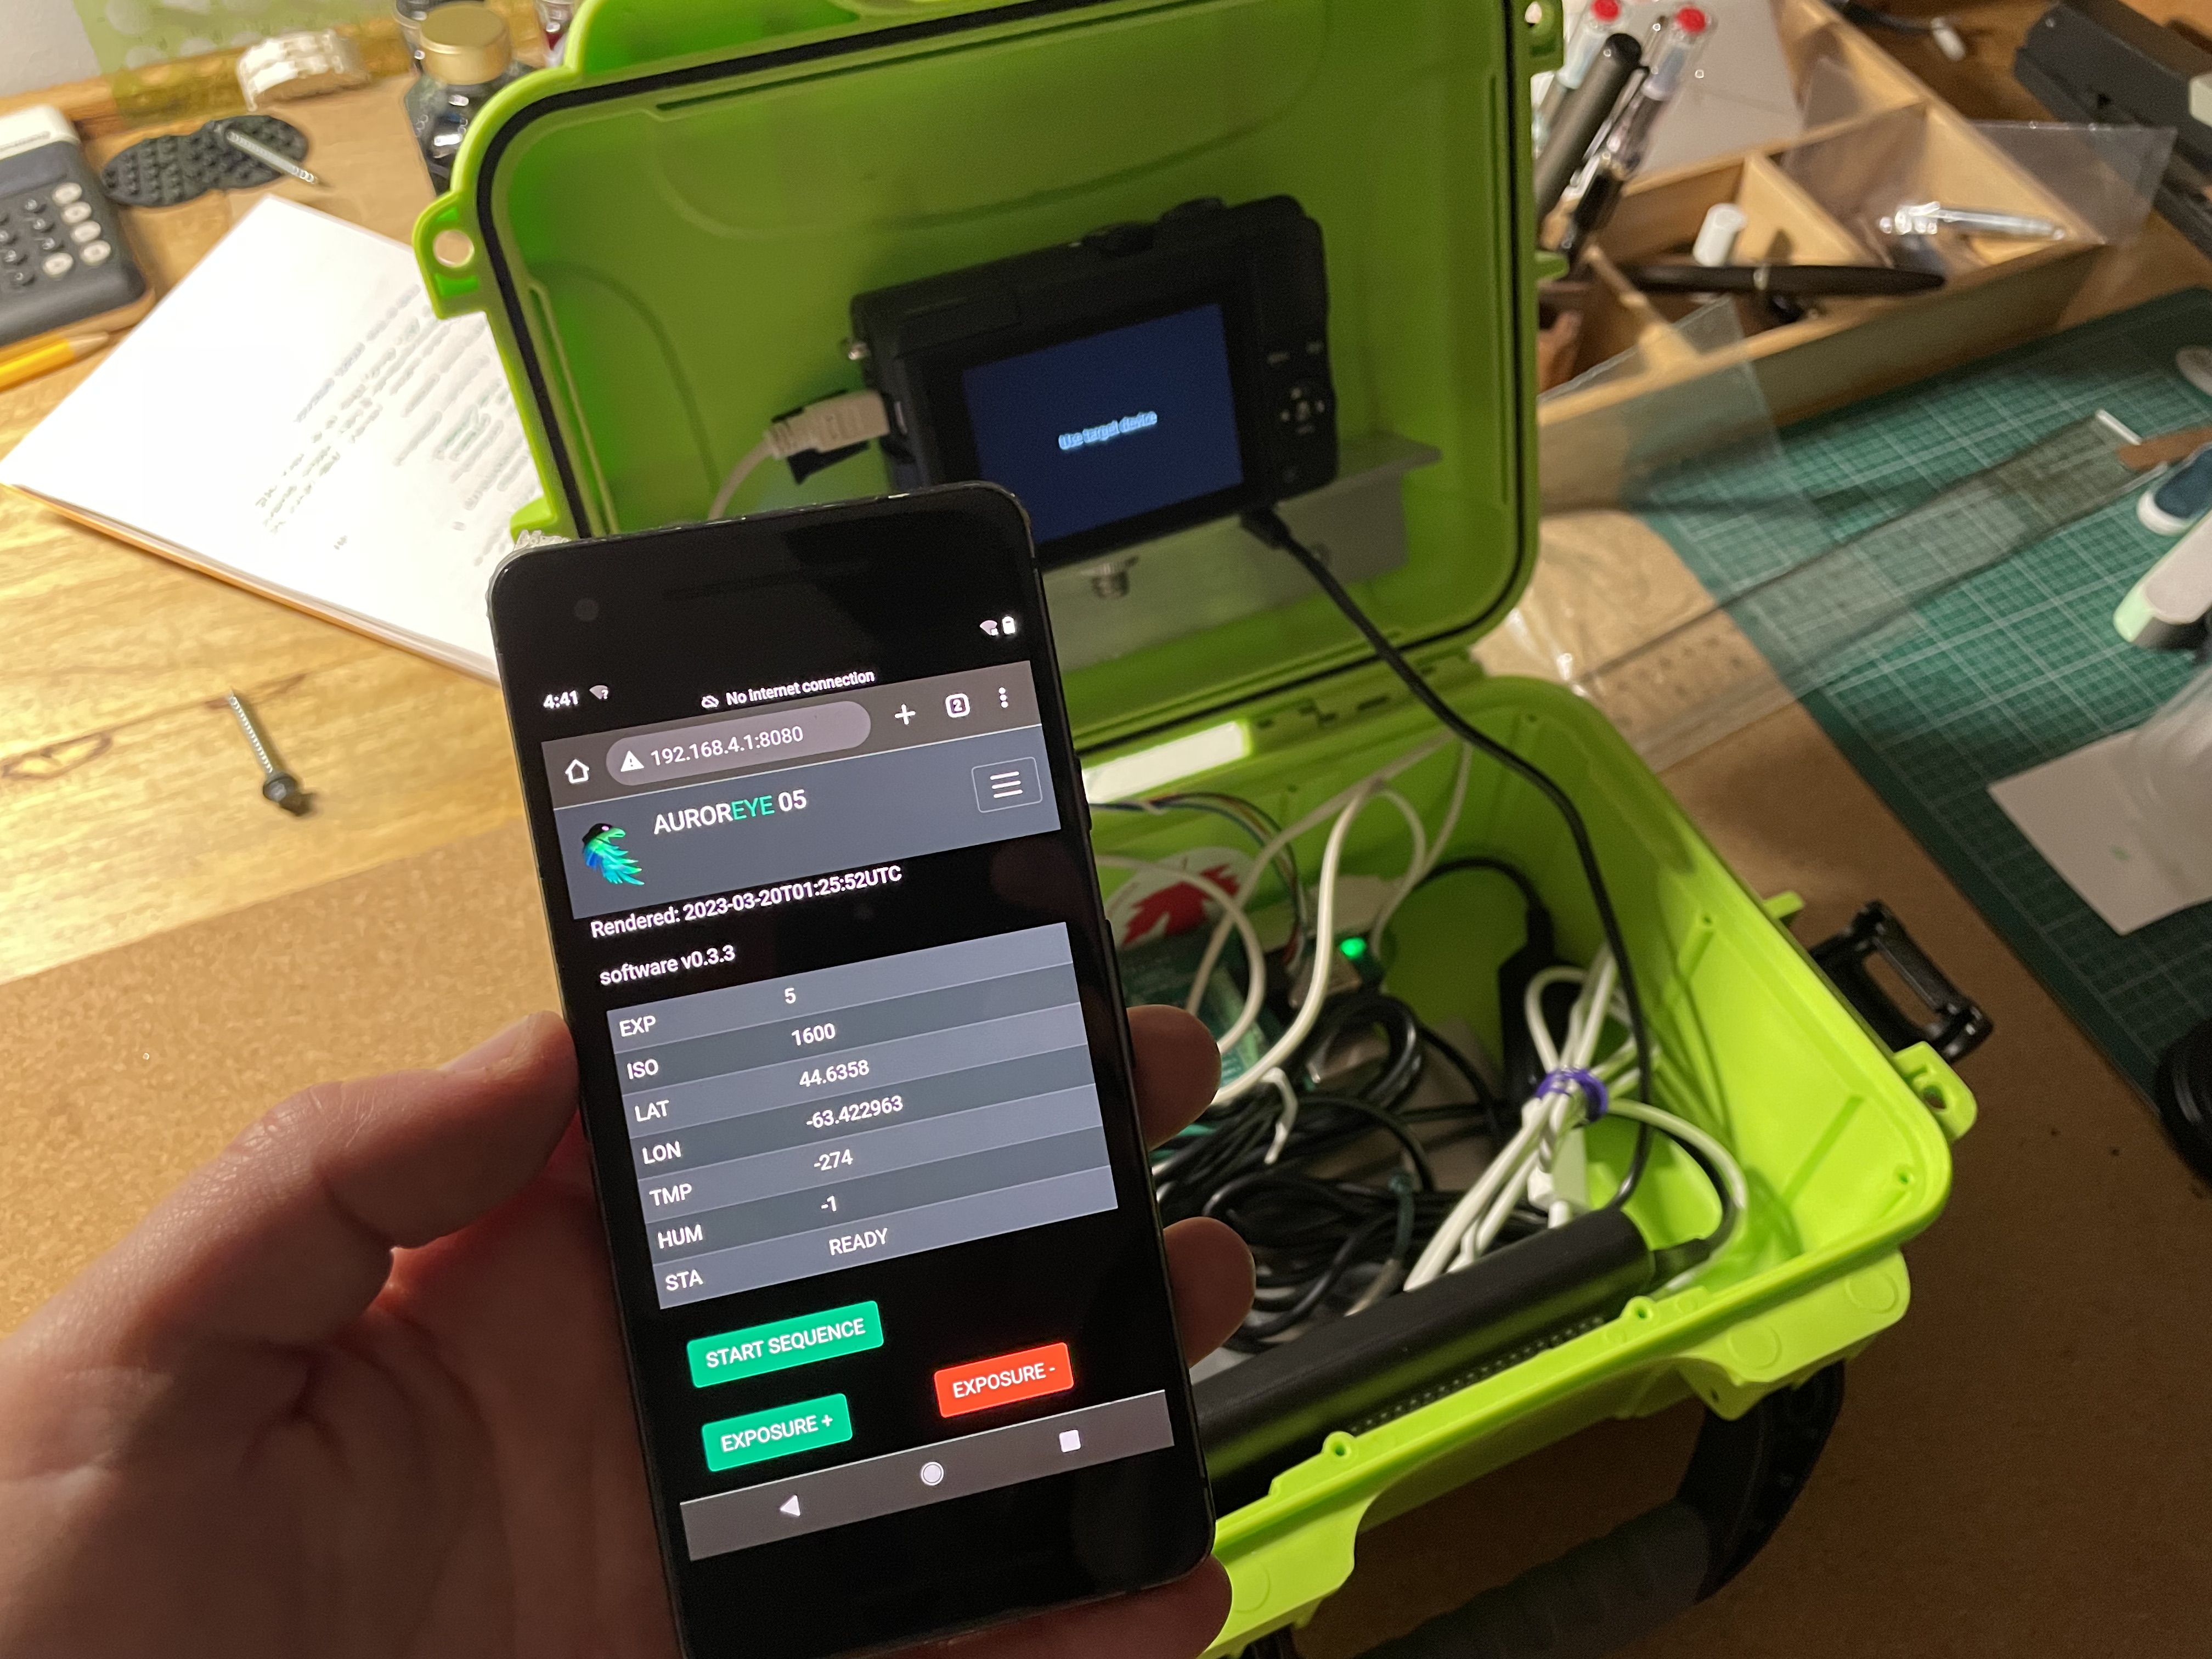
Unit 05 was an exercise in minimalism - there was very little time to built it before it was due in Yellowknife for a week of testing. This meant cutting it to bare bones, which was also a great learning opportunity:
- The Raspberry Pi disk image was successfully cloned over to the new unit, demonstrating that we can potentially provision the units quite quickly
- The software was updated to just "roll with" missing sensors. This increased the robustness of the software to errors due to bad connections, sensor data dropout. It also means that various levels of AurorEye can be built with varying sensor loads and controls
- This was a 'headless' unit - no buttons, no built-in display, no power management switchgear - everything was controlled via the wireless access point's web interface, which shows the latest imagery and telemetry, wehile allowing control of sequence shooting and exposure, as well as viewing the AurorEye log to debug in the field.
Stretch Goal: simultaneous image capture from two AurorEye units
A stretch goal in late March will be - if both units are operational and in position, can they simultaneously capture imagery on the same night? This would be a demonstration of an ad-hoc all sky camera network. Fairbanks and Yellowknife are about 1600km apart, so there would likely not be any imagery overlap, but showing two animated image circles on a map would be a significant step in proving out this project
Development Update: February 2023
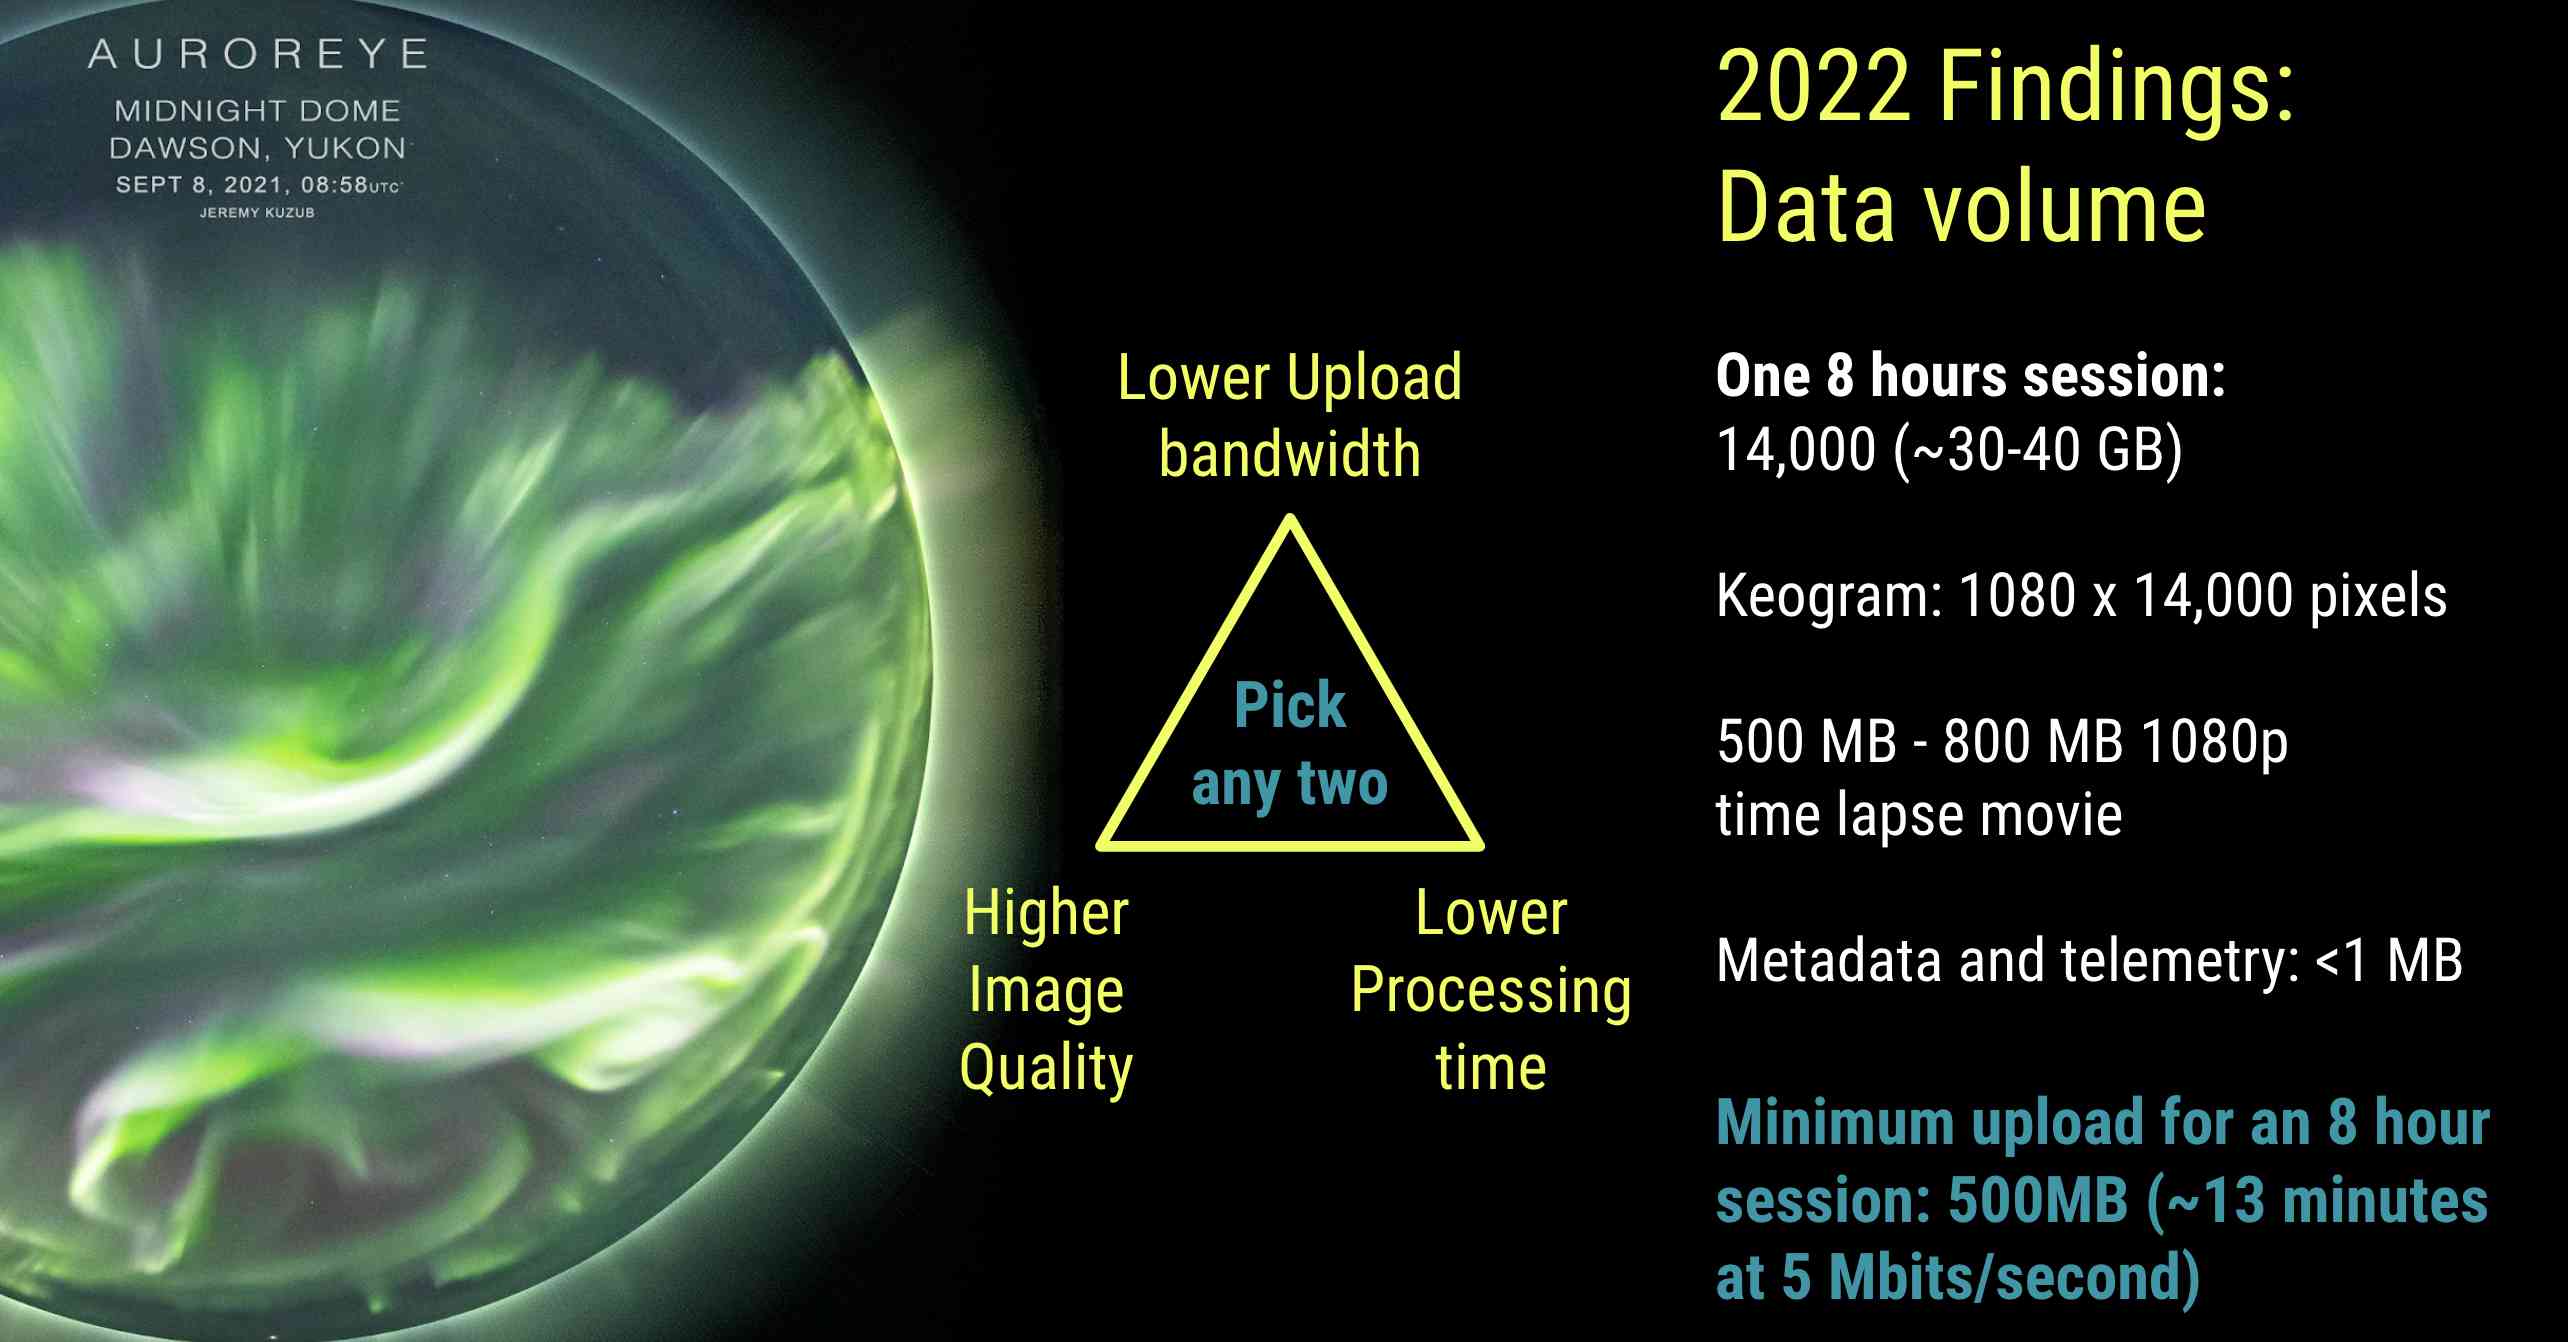
The theme of this month's updates are "Doing What You Do Best". What this means is splitting the computation between the onboard computer and the Cloud differently that originally planned due to limitations of the Raspberry Pi, and the increase in available offload bandwidth for Aurora Chasers:
The tl;dr is this: we know we have more upload bandwidth than originally planned, so why not use it, leaving the AurorEye out of the pixel-level image processing pipeline in order to maximize the image resolution, quality and imaging cadence of the AurorEye hardware.
Let's look at three key changes that resulted:
Move away from 1080 locally encoded video with "HUD" overlay
This is computationally intensive for the RPI at two stages:
- During image capture when the rpi applies the data overlay -this requires re-save of a the original camera JPG, which has a penalty of double-image-compression, and up to 1.5 seconds of compression time
- During video encoding from JPEG to MP4 1080P via the RPI hardware encoder, which takes time and has absolute hardware limits to video quality.
This approach was "traditional" meaning a standard All-sky camera approach of outputting a data-overlaid timelapse movie, and reducing the data from the Gigabytes to the Megabytes range. In reality, we do have the upload bandwidth and the time for Gigabytes range, and that network rate will only get better with time. For this reason, we are...
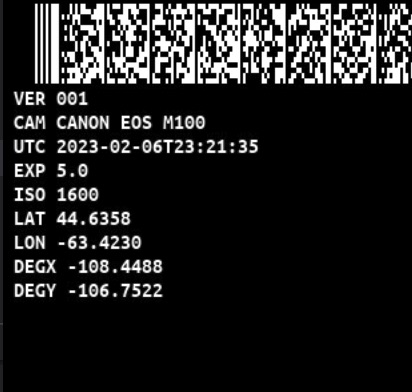
Moving ahead with 4K+ image sequences with Metadata embedded in the EXIF header
The camera can shoot up to 4000x4000px (8K) JPGs at a rate of 30 frames per minute (2-second exposures), and maybe twice that.
Rather than overlaying meta data like GPS location and timestamp on the image, it can be more efficiently and quickly embedded in the JPG file EXIF tags. This embedding step can keep up with the file size and cadence for at least 2 second exposures at 4K.
This allows us to quadrupling the resolution (not to mention quality due to less compression) versus the old 1080p MP4 video method, since we are freed of RPI video hardware limitations.
In order to efficiently get thousands of JPGs uploaded to the cloud, they are combined into a standard TAR file. This is not compressed, since the JPGs are already compressed), bypassing the intensive video creation step and the arcane ffmpeg encoding step. This minimizes onboard processing time and maximizes quality, allowing video to be created in the cloud at a later date from higher quality images
Remote management
Ultimately the first few units will need software updates, log reviews and fixes via remote.
After considering several methods such as a custom zip file update system or software update via the Python package manager PIP, the most flexible system was VNC remote access using a cloud connection service. This has the advantage of not committing to a single software update method (which has limited access), while providing maximum access to the RPI in the AurorEye units remotely. Using a cloud connection service such as RealVNC also leverages their security protocols and does not require AurorEye users to set up their local Internet/Local Router with port forwarding or other customization.
While all these changes have required some rewrites of the AurorEye software, they should better match the strengths and limitations of the onboard RPI, the Cloud, and the internet connection between them.
Development Update: 🌎 AGU 2022
AurorEye got some exposure as a poster under the MacGyver Sessions at the American Geophysical Union Fall 2022 Meeting. Here is the poster link. Thanks for Vincent Ledvina of the University of Alaska (Fairbanks) Geophysical Institute, and HamSCI for helping citizen science efforts get some attention, and a sincere thanks to Dr. Liz Macdonald of NASA Goddard and Laura Brandt of Aurorasaurus
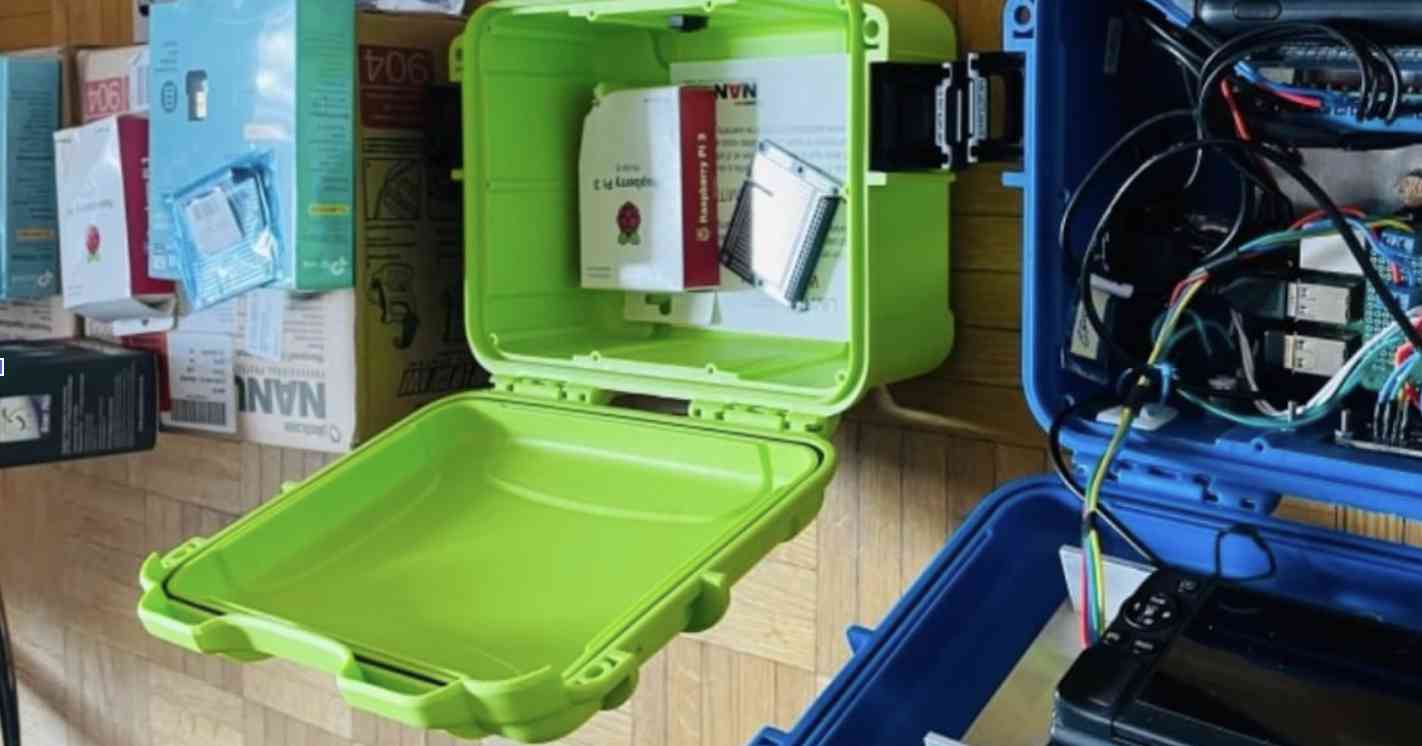
Some of the new developments presented included version 2 of AurorEye: 1/8th the volume of the original, and using custom Raspberry Pi Hat:
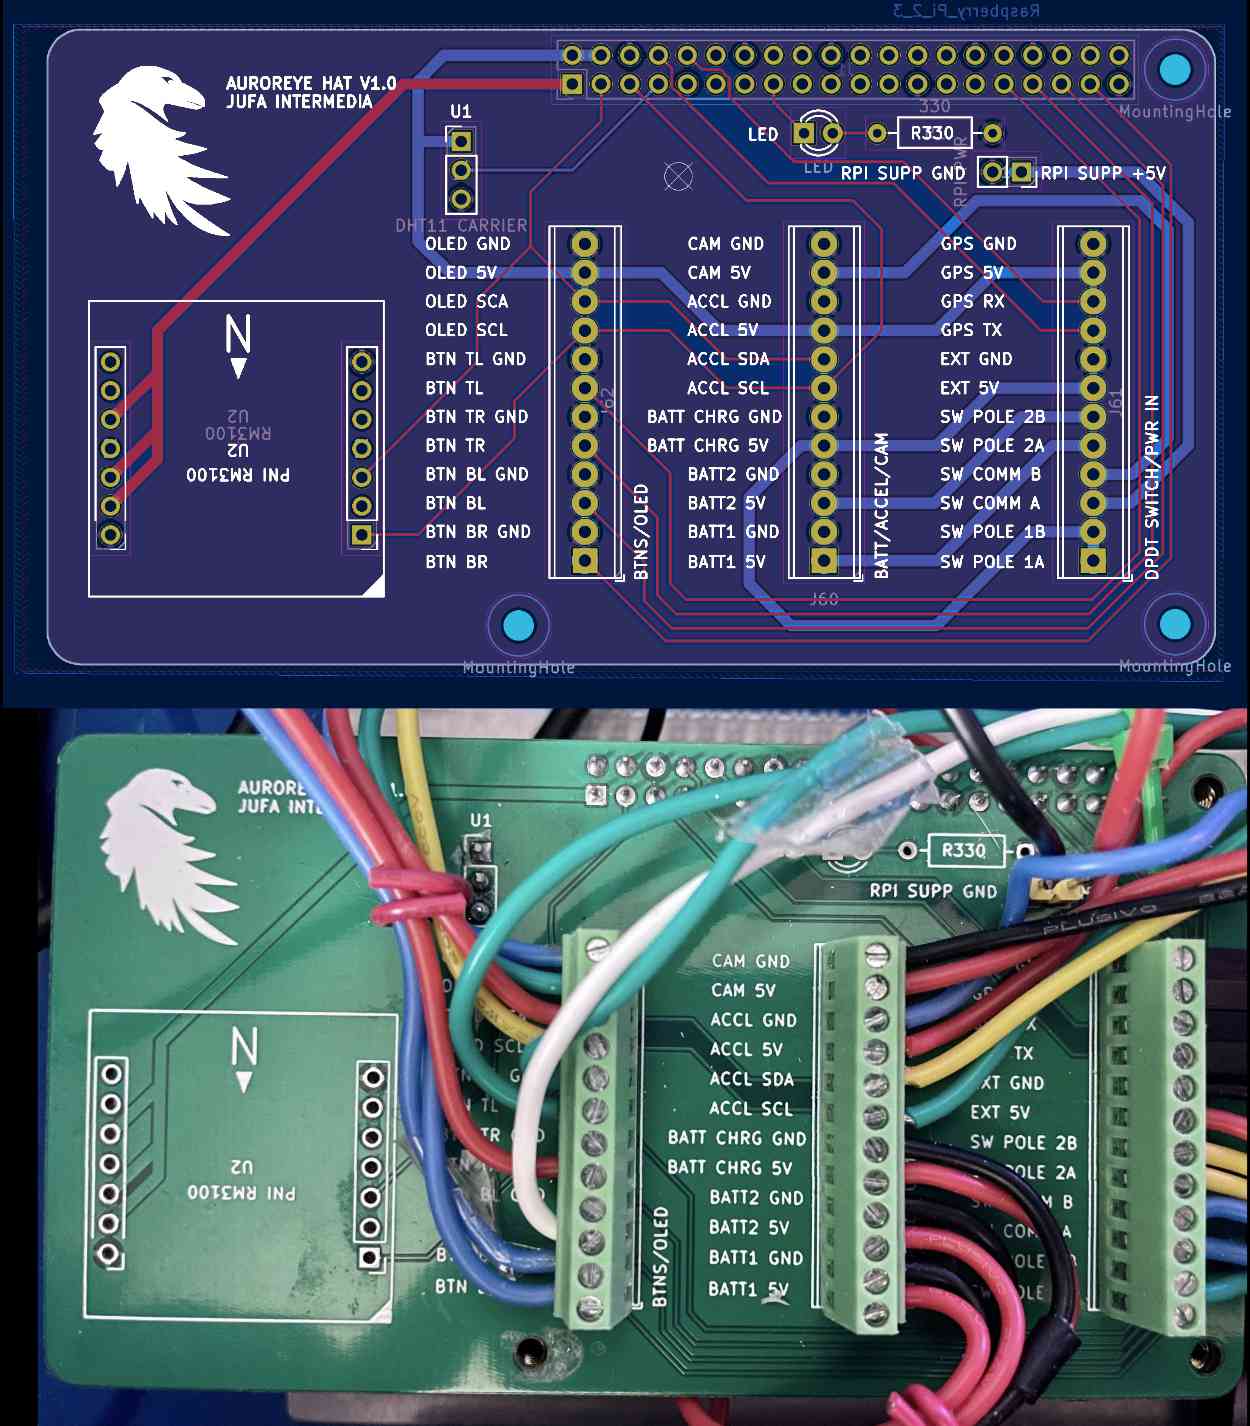
Parts are harder to find this year, however the cameras, PCBs, cases, lenses, and Raspberry Pi's needed for several units are now in and ready for assembly:
Field Update: 👾 Dark Skies and Leonid meteors in Nova Scotia
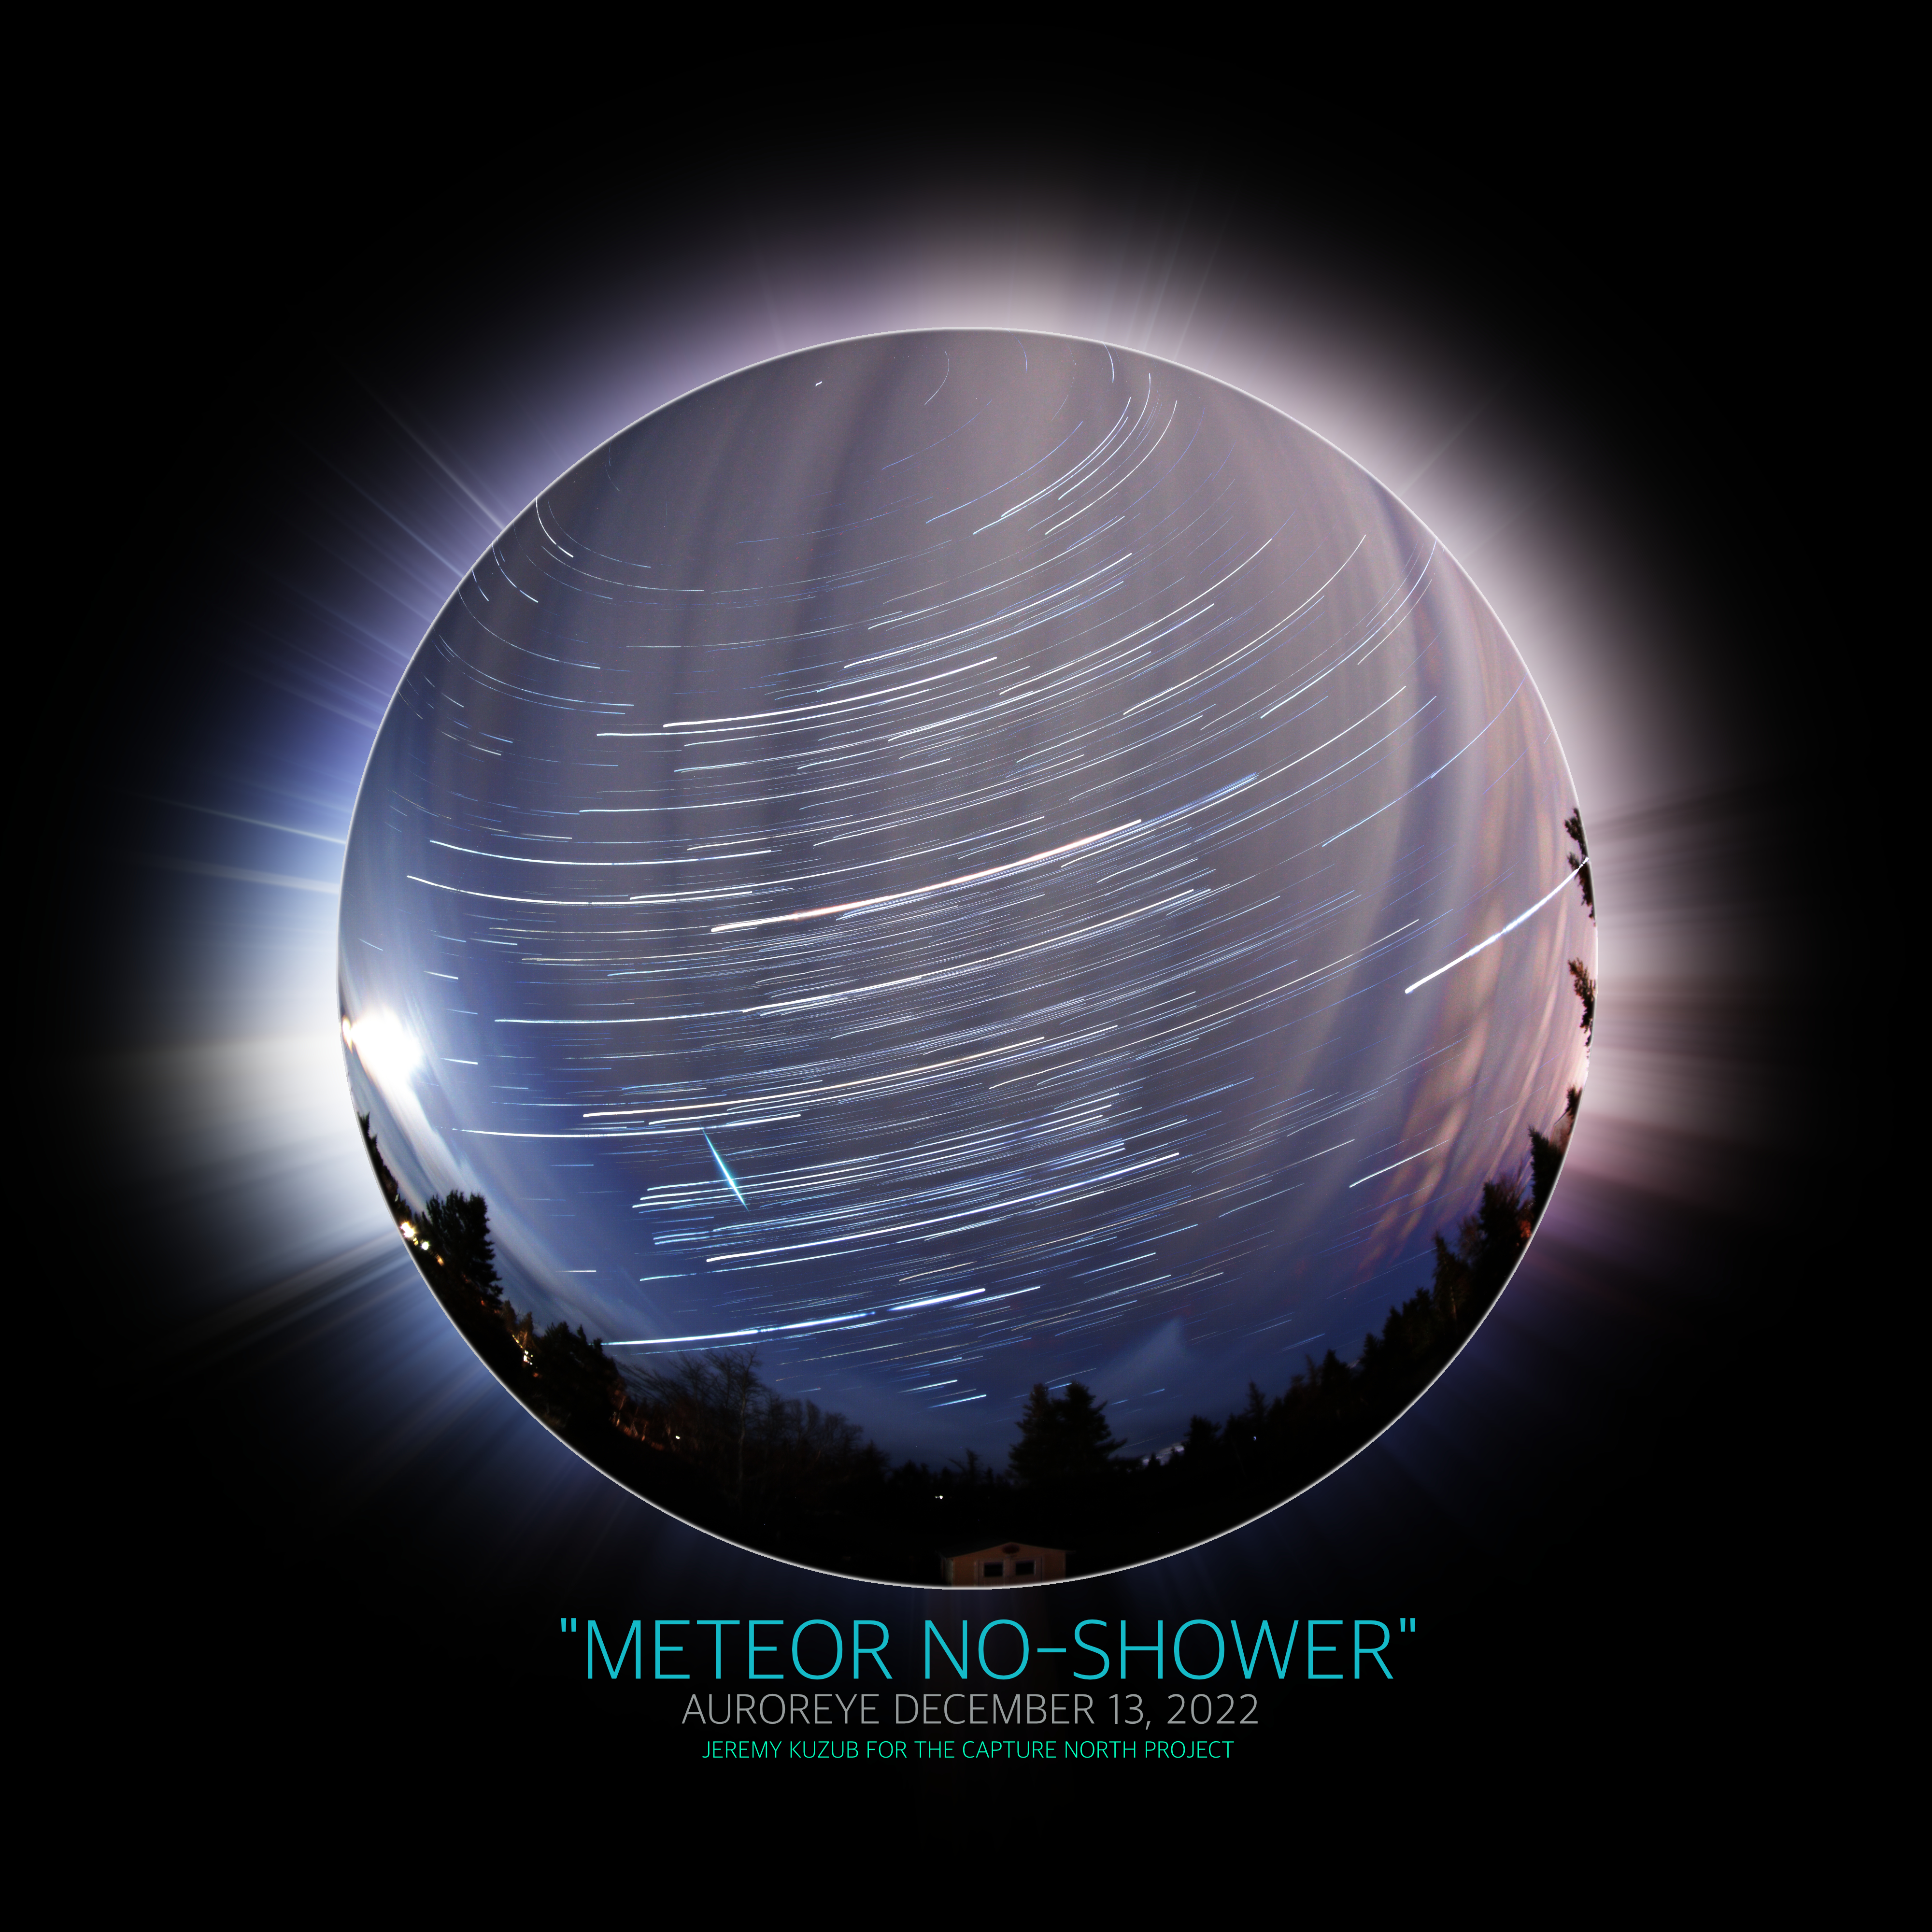
AurorEye can also work as a meteor capture timelapse imager.
- Low inter-shot black out period, meteors will have a hard time slipping in between exposures. In this case, the exposure time was 30 seconds per frame, subsequently stacked.
- AurorEye is designed so that the Burst Mode of the Canon camera is used, allowing shots to be continuously channelled through the high-speed camera internal buffer, then to the internal SD card, and finally to USB storage mounted on the Raspberry Pi module. This results in smoother timelapses since the shutter is almost always open.
- Cameras like the Canon have a failsafe feature to prevent the shutter or battery from wearing out if the shutter button is inadvertently depressed during storage: the burst mode stops after 999 shots. This had to be accounted for in AurorEye control software to allow it to take advantage of the minimal blackout time between frames that burst mode enables. Along with that, dark frame-based noise reduction must be turned off in the camera. Noise reduction using dark frames takes a second exposure with the shutter closed to detect and cancel hot pixels and other artifacts.
Overall, we were pleased with the capability to capture meteors and it adds to the possible uses and future extension of AurorEye
Development Update: 🎱 Deciding where to do the number crunching
AurorEye can shoot all night long at 1800 frames per hour at 4K resolution. That's quite a bit of data that needs to be processed and uploaded.
Some of the tools we have at our disposal to shoot all nigh and process during the non shooting periods:
- 50,000+ frames of onboard storage at 4K JPG
- Onboard hardware accelerated h.264 movie encoding (but for HD 1080p only)
- Wifi connectivity to the Aurora Chaser's Home Base internet connection
- Cloud based storage - Google Cloud services
Onboard encoding and processing of frames into h.264 MP4 movies and PNG format keograms is a feature of AurorEye. Since it will be idling in the late morning after the Aurora Chaser stumbles wearily back through their door and shakes the snow off their boots, it makes sense that it processes the capture footage that night and uploads it - essentially it has nothing else to do during the day.
But there are options:
- The 1080p movie and keogram are uploaded to the cloud storage automatically, along with log files with associate meta data for that night's sequences
- If the night's images were quite extraordinary, the individual 4K source frames can be uploaded as well
The h.264 movie for a night of shooting is about 200-1000MB in size, depending on JPG scene complexity and number of frames, processing takes about 10 minutes per hour of timelapse onboard the AurorEye
AurorEye also includes the ability to purge internal storage of any 4K frames and uploaded sequences, freeing up space. Alternatively the aurora chaser can simply remove the SD Card and mail it to AurorEye Home Base using snail mail, and slip in a new SD card of any size.
Providing maximum flexibility is part of getting the best data we can out of the system.
Field Update: 🥶 -20degC and Hand Warmers for Robots
AurorEye has to be able to shoot in cold weather.
Fortunately it has performed well so far. It is close to a sealed unit, and a small internal volume, so the electronics power dissipation of about 5 Watts is enough to keep the temperature elevated versus the environment.
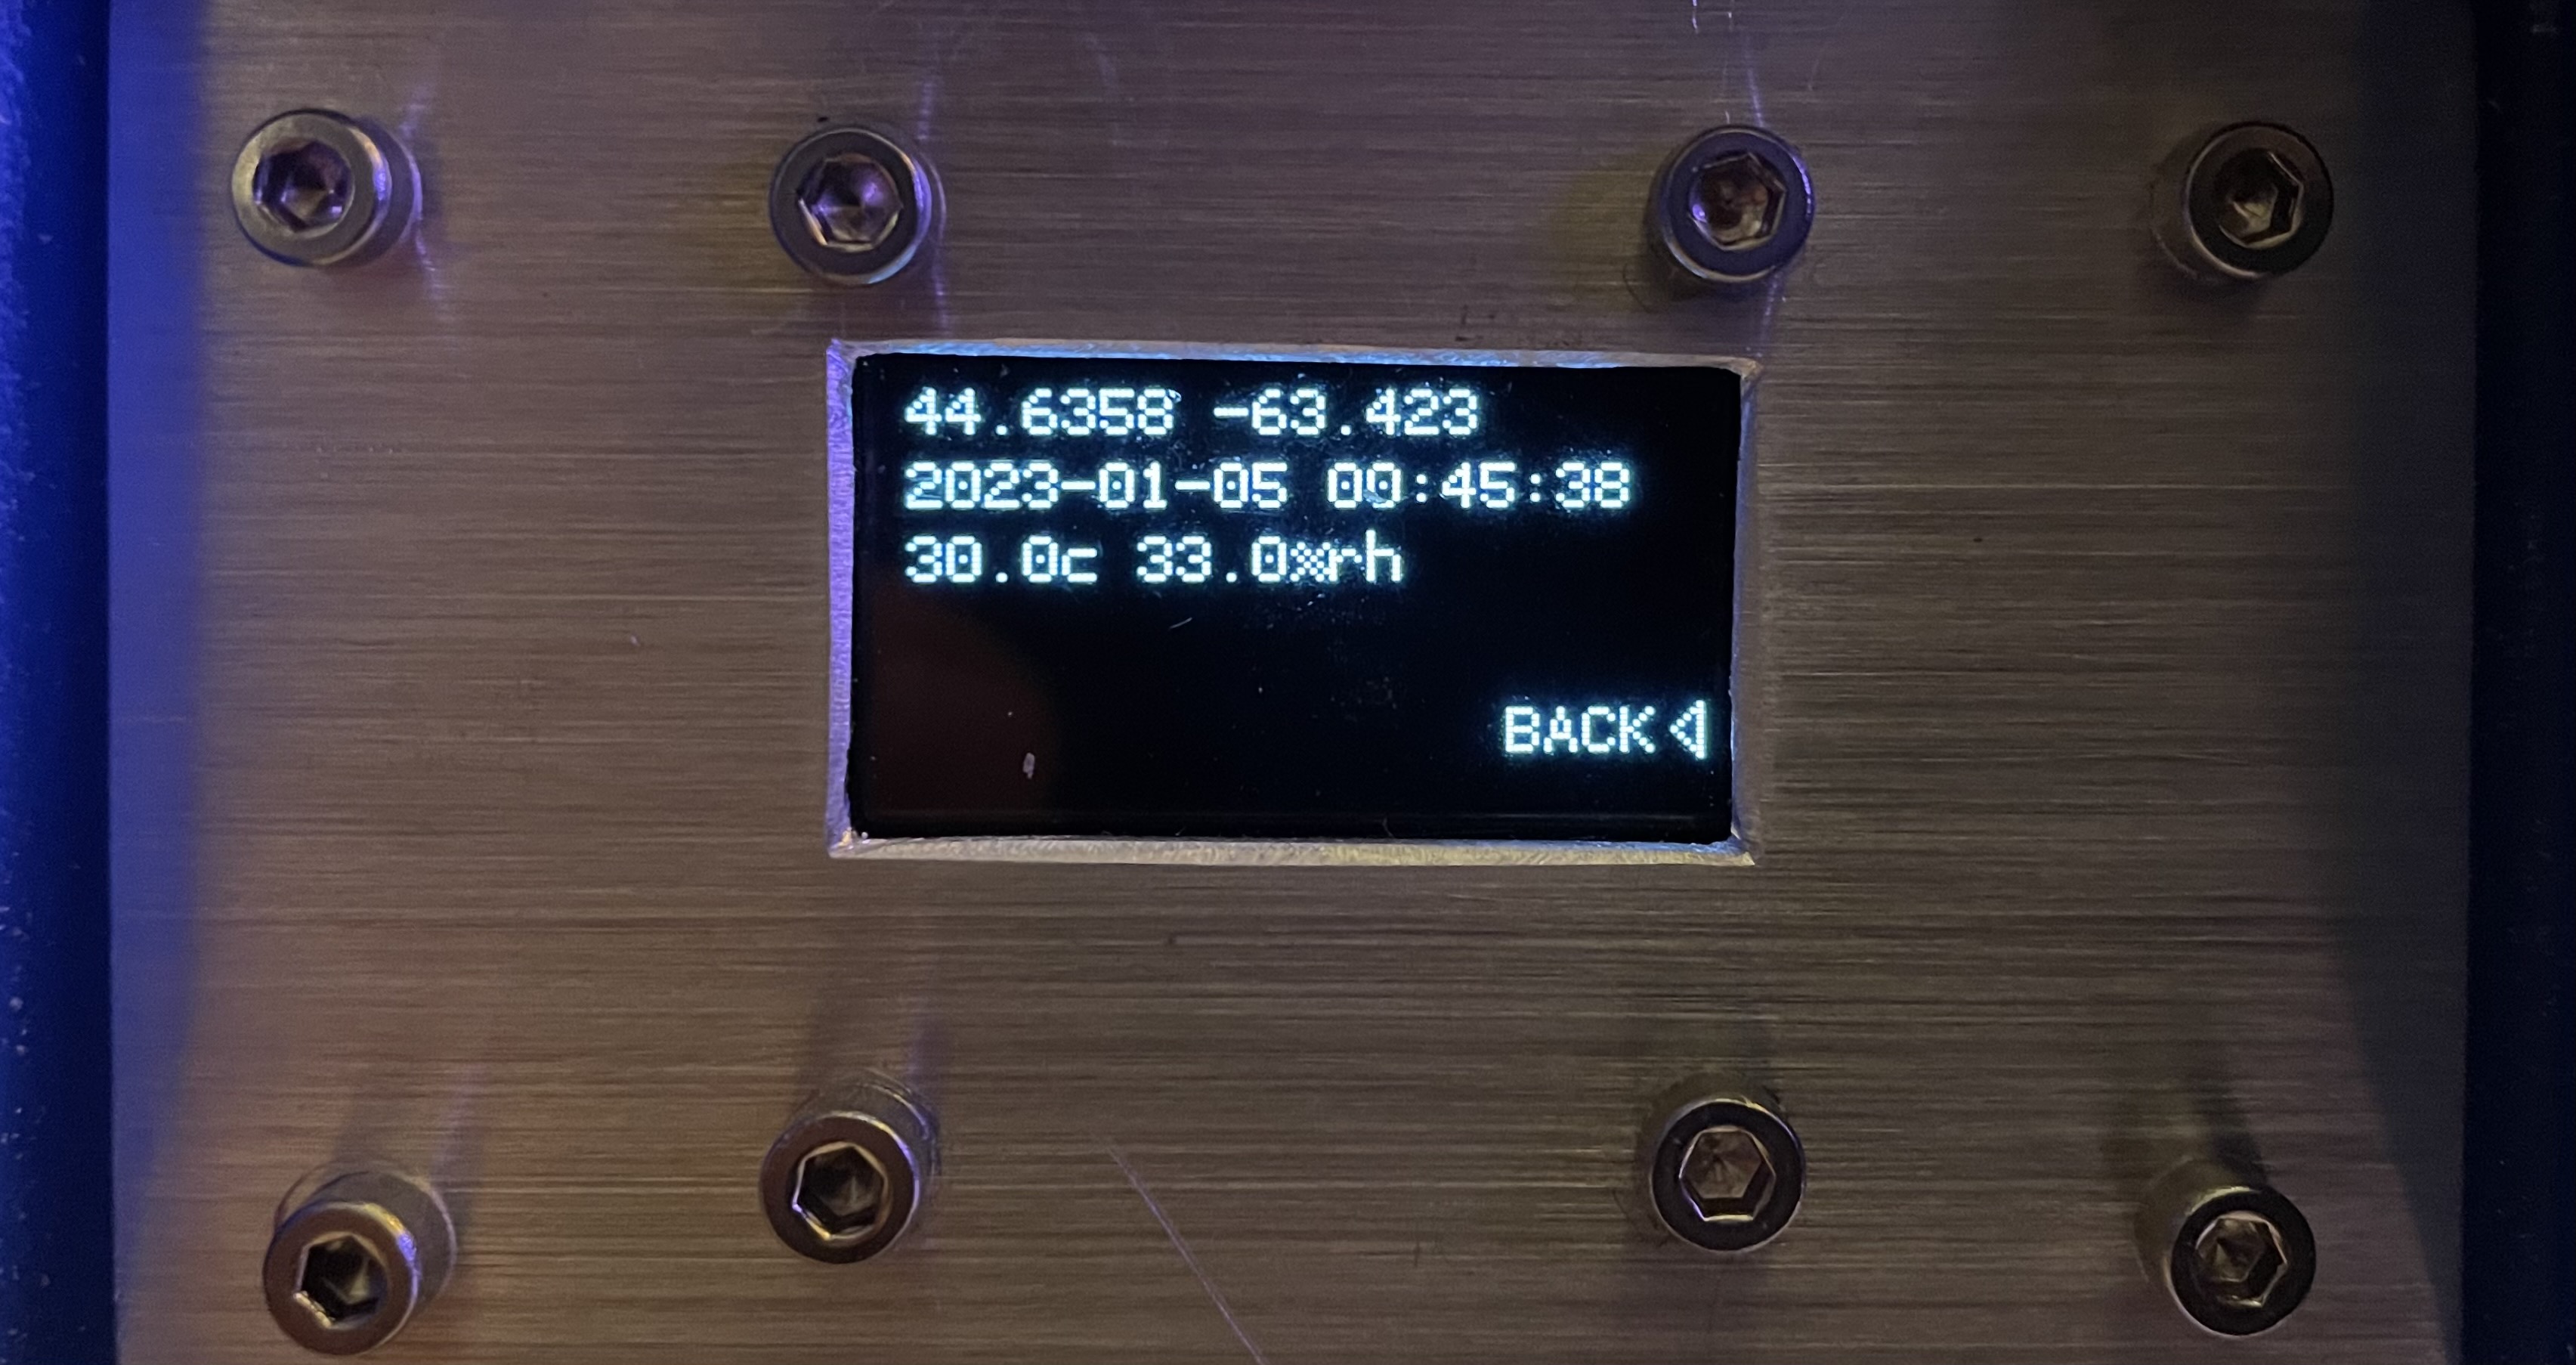
It also has a humidity and internal temperature sensor that can be used to monitor and track changes in performance with these atmospheric variables
Testing in Alberta and Yellowknife in fall and spring conditions (-15degC or so) show a stable internal temperature is reached because of electronics power dissipation. This is a gide on how to use AurorEye in cold weather
- Keep AurorEye on - don't bother conserving battery power. A liIon battery needs to be warm to work (and can be damaged if charged cold) - leaving the unit on self-heats all the electronics and battery
- Mist likely not a great idea to take the AurorEye back into the heated, humid comfort of your vehicle when relocating to another area to shoot - lens condensation may result. TODO: track humidity and temperature over time to be able to provide a condensation warning
- If temperatures are really low, consider adding a few hand warmers to the internal space of the AurorEye. An increase of a few degrees has been noted by doing this.
- Thermal insulation may be a good addition to the units
- The Raspberry Pi can act as a heater: The CPU can create a significant amount of thermal energy when running. Adding additional tasks to the 4 cores of the CPU may effectively increase thermal output!
Development Note: 🕹 interfaces, menus, and mittens
AurorEye is Mitten-Friendly. This is important, because the users will often be in -XXdegree temperatures for hours on end.
Modern camera interfaces usually use tiny buttons, touchscreens, or Wifi phone interfaces to automate timelapse shooting. Generally they are not that fun to use in real world Aurora Shooting conditions
While AurorEye can communicate and do advanced configuration via its local wifi hot-spot and the user's phone, out in the field, the design is meant for use while fully protected from the cold
Constraints force simplicity and usability. Having only 4 buttons streamlines ones thinking about the user interface. A small monochrome OLED screen (which is good with the cold) enforces the hands-off functionality of AurorEye
Development Note: ⚡🔋 Power and Voltage Supply

AurorEye has some thirsty devices on its power bus that all need to be fed their specific diet of voltage and current.
5V can be supplied with an external barrel-jack adapter, which can charge the main battery pack and run the primary power bus. Consumption is typically about 1.5 Amps at 5VDC.
Most bus devices such as storage and ethernet are powered through the USB-A connectors on the Raspberry Pi.
I2C connected devices typically require a small amount of current at either 5VDC or 3.3VDC, which can be supplied by the RPI interface header pins via the custom PiHat.
High sensitivity magnetometer may need a separate cleaner power supply, although this has yet to be determined in relation to other electromagnetic noise sources, such as the DC/DC converter and the camera shutter.
The camera requires a dedicated step up converter to supply 7.2V, as it is typically powered by its own internal LiIon battery pack. Step-up converters in the is application have some special requirements. Since the camera is forced to be "always on" the converter cannont supply any residual voltage to the camera, or it will not truly be 'off'. Nor can it supply any less than the 7.2V during power-up. Either of these states may make the camera's on internal power-up sequence misbehave.
To improve the behavior of the camera DC/DC converter, a load resistor can be attached across the output of the converter of about 5 kOhm. This will bleed residual power out of any capacitors in the converter circuit, preventing residual voltage from keeping the camera from powering up and down cleanly.
Another consideration is the off-the-shelf LiPo battery pack, usually used to charge mobile devices through USB-A. This has to be ready to supply power when AurorEye is hard-started - this means it cannot require a separate button push or a special power sraw or signalling from the USB-connected loads. It also cannot auto-power-off if insufficient current draw is detected, which can be an issue with some supplies. Finally, the battery cannot cease supplying power if it detects some input current on its charging port, since the charging port is always connected to the rest of the power supply bus. This means that any off the shelf power pack needs to be checked out for proper behavior during power-up, charging, and continuous running, especially in cold conditions.
Development Note: 📷 Thoughtful choices in ISO, aperture and shutter speed

AurorEye is a light bucket over space and time. We have to get the most out of consumer grade imagers (which are very good) by not over or under exposing the sky and the aurora.
Aurora have large changes in brightness and apparent motion between active and quiet times. A sane choice from experience is to let the Aurora Chaser set AurorEye in one of the following configurations, all of which use the Fisheye lens at full open (f2.0):
- 2 second exposure at ISO 800, 1600, 3200
- 5 second exposure at ISO 800, 1600, 3200
- 15 second exposure at ISO 800, 1600, 3200
- 30 second exposure at ISO 800, 1600, 3200
This covers the approximate range of visible aurora exposure latitudes we can hope for at 8 bits per pixel per channel. The operator can set the timelapse sequence to any of these.
Motion was deemed to be an important kind of data to capture, so the default is 5 seconds at ISO 1600
Development Note: 📸 Choosing a camera control interface
AurorEye, at its heart, is a camera control system that must interface with a high resolution, high-sensitivity, off the shelf consumer camera.
Consumer cameras generally have three methods of being controlled externally:
- With a remote shutter release - very basic control, no offload or settings adjustment
- With a proprietary WiFi communication protocol. For example, some of Canon's cameras have a REST API that can be interacted with by a wifi connected http capable interface. This tends to be quite slow for image transfer, however.
- With a Picture Transfer Protocol compatible communication stack (often over USB). The "Python Library PTPy is a python implementation.
- With vendor-specific extensions to the Picture Transfer Protocol, or fully proprietary protocols that allow partial or full access to the cameras features, settings, configuration, and setup.
PTP sees the best way forward as it is reasonably standardized and has provision for faster file transfer over a robust(ish) physical layer (USB) that does not take up an additional WiFi connection for the communicating system (computer, e.g. Raspberry Pi).
But it is low level, and does not define the communication stack (io.e. the physical communication layer). Some vendor-specific extensions and behavior have been mapped out in the gphoto project. gphoto has a command line client interface called gphoto2, and a C++ library called libgphoto2 for finer control (also used by the CLI).
Most relevant to AurorEye, Jim Easterbrook has created a Python wrapper for this C++ API called Python-gphoto2.
Note: The gphoto project organization on Github has a python wrapper repo for libgphoto2, but it seems to not be maintained as frequently as the above repo.
libgphoto2 is frequently updated to support new cameras via USB connection. The full list is here.
libgphoto2 (and by extension the python-gphoto2 wrapper) support different level of compatibility with different cameras and manufacturers. It is not supported by manufacturers, so functionality is generally a subset of the full camera settings. If a camera's proprietary interface is not accessible, the PTP layer (described above) is used as an intermediary.
For AurorEye, Canon cameras were chosen because of reasonable support for by libgphoto2, including burst mode shooting, basic camera setting control, and image offload during burt mode shooting at a sufficient rate.
Some of the functions used:
- Get and Set camera configuration (ISO, Shutter speed)
- Virtually press and hold/release shutter button
- Inspection of the onboard SD Card file system including download and deletion
- Camera event message monitoring (and associated callback registry) to act as a polling system, as the communication interface is asynchronous to commands issued (sometimes multiple times) and data transferred
Some of the issues to contend with using this communication approach:
- There is no command queue - AurorEye software must keep checking that a command has been accepted and issue a reasonable number of retries and a failure handling mechanism
- The burst mode method of gathering timelapse data with a minimum blackout between images runs up a gainst a safety feature of the Canon camera: a maximum of 999 shots for a given burst. The shutter up and down command must be successfully issued before 999 frames are shot
- Unable to set capture quality/movie mode: at Least for the M100 Canon Camera, these cannot be accessed or set and must be configured one-time using the interface
- In burst mode, inability to offload images directly through USB to RPI mass storage. The SD Card must be used as an intermediary.
- Image storage to SD card from Camera Buffer takes time, as does the event system that notes an image has been stored. This means there is a delay between the end of an exposure and the moment that image ends up on the RPI USB mass storage system
- Cannot access the internal timelapse functionality (it does not really meet our needs anyways, but if it did, for example allowing arbitrary timelapse settings, that would reduce much of the RPI software duties.
These limitations may not be present on other Canon camera models, or there may be different limitations. For example, the M100 stores RAW images in the lossless/uncompressed CR2 file format which results in files of around 30MB each. The newer M200 supports both the REST WiFi API (too slow for image transfer for our needs) and the CR3 lossy RAW format, which would be better for mass storage and transfer of ASI timelapse data.
Overall, necessity is results in creative thinking, and these limitations and capabilities have been woven together (and sometimes bypassed) to allow AurorEye to meet its imaging requirements. A Huge Thanks to all the maintainers who have made these projects what they are today.
Frequently Asked Questions
About AurorEye Imagery:
Where can I view AurorEye timelapses?
This dedicated YouTube playlist has all videos in 4K resolution (https://youtu.be/cMFbIgYoFqg?si=eRWC28COtkQwhWa3)
What is a Keogram?
Keogram article on Wikipedia AurorEye timelapse summaries us a Radial Keogram to act as a visual clock of overhead aurora activity - the more green and red, the more aurora is visible at that time
Where I request specific frames or sequences from AurorEye videos for non-commercial research use?
Please contact us using the email in the Contact Section
Can AurorEye all sky timelapses and images be seen as immersive media (i.e. YouTube360)?
Yes, please see this sample youtube 360 video for immersive first-person view sample. Works on phones and laptop/desktops
What aspects of AurorEye are considered approximately calibrated?
- Location (fuzzed to keep aurora chaser locations discrete)
- Orientation to zenith (part of setup and levelling by aurora chaser)
- Image timestamps to within about 1 second (either start or end of exposure depending on specific camera)
What aspects of AurorEye are considered not calibrated?
- Mapping of image pixel brightness in RGB channels value to actual flux - this is determined by the camera internally, and could potentially be calibrated with standard sources
- Geometric parameters of lens and sensor (intrinsic parameters)
- Please check out this link about calibration considerations for commercial RGB sensors with Bayer pattern filters
For Operators or Educators:
Are AurorEye units available for sale?
At this time they are lent out to qualified aurora chaser participatory researchers and are not for sale
I run an education program on Aurora, can I use AurorEye timelapses or imagery?
AurorEye timelapses on the YouTube Playlist can be used in non-profit educational settings with permission. Please get in touch via email and let us know how you with to use the content
Can I operate an AurorEye unit next season?
Please get in touch with us using the Contact Section
Is there a mailing list for updates?
Please sign up for the newsletter using the Contact Section
Could this camera be adapted to record meteor showers or watch for red sprites?
AurorEye cameras capture the whole night sky and have recorded meteors before, so this is a potential use for them
How is AurorEye different than Raspberry Pi "All Sky Camera" projects I have seen online?
There are several wonderful projects to democratize all-sky imagery, typically focusing on fixed installations with cameras like the Raspberry Pi HQ Camera. AurorEye is designed to gather high quality imagery and be portable, self contained, offline-capable, and very easy and quick to set up. The project also includes cloud upload and a software pipeline to publish 4K timelapses online.
Can I see what AurorEye is capturing in real time?
AurorEye is designed to be out in the field with aurora chasers, away from internet connectivity. However, any smartphone within 10m or so of an AurorEye unit can connect to its wifi and view the images that are being captured in near-real-time
How long does it take to set up AurorEye in the field?
About 2 minutes: turn the unit on, put it on a standard camera tripod, level it so it it pointing straight up (with the onboard levelling sensor), and press the Start button
What exposure times and frame rates can AurorEye capture?
As short as 1-2 seconds to as much as 30 seconds per exposure. Each exposure starts as soon as the previous one ends. This covers situations with fast motion as well as dimmer aurora
Can I leave AurorEye out for multiple days?
AurorEye cameras are designed to travel with the aurora chaser during their chase. Units should be brought inside after a nightly chase
How many images can AuroEye capture in a session?
typical AurorEye sequences will be several hours and several thousand frames. On board storage can store about 60,000 exposures
How do I offload images from AurorEye?
By pressing the Offload button, images are automatically uploaded to the cloud for processing and sharing. 50,000 - 60,000 images can be stored on AurorEye before offload is necessary.
How good is the image quality?
The camera in an AurorEye unit is a consumer CMOS APS-C sized sensor. Images are captured in a circular fisheye format covering 4000 pixel diameter with 8-bit RGB channels. Pixel pitch is approximately 3.7μm
How much photography experience is required?
None, however most people that might want to operate an AurorEye unit already have some aurora photography experience
Can I fill out survey allowing me to provide feedback about AurorEye features?
Here is a link to the The AurorEye feature vote form. Your feedback is welcome
Is AurorEye Hardware and Software Open Source?
At this time the source code and hardware are under active development, and have not been released as OSS or OSH
Is AurorEye designed for fixed locations?
The current version of AurorEye is focused on portability - a feature of the project is the ability for aurora chasers to chase to the best locations, and not stay at home where there may be non ideal conditions, like visibility, cloud, light pollution
Is there an #AurorEye hashtag across social media?
Yes, #AurorEye hashtag is used for content on several platforms including YouTube, Twitter, and Instagram.
For obtaining, using, and citing imagery:
Where can I request specific frames or sequences from AurorEye videos for non-commercial research use?
Please contact us using the email in the Contact Section
Citing AurorEye or using AurorEye content in a conference poster, paper or other publication
- For individual frames or special timelapse sequences, please contact jeremykuzub@jufaintermedia.com
- BIB code on ads for AGU 2022 presentation: https://ui.adsabs.harvard.edu/abs/2022AGUFMSH51D..04K/abstract
- APA style website citation: AurorEye automated portable aurora all-sky camera system. (2024). AurorEye.ca. Retrieved April 12, 2024, from https://AurorEye.ca
- APA parenthetical: (AurorEye Automated Portable Aurora All-sky Camera System, 2024)
- Author contact: Jeremy Kuzub, Jufa Intermedia (jeremykuzub@jufaintermedia.com)
I am doing some image processing. Where can I find specific information like lens and camera parameters for specific AurorEye content?
Current Units use Canon APS-C 24MP sensors and Meike 6.5mm Fisheye f/2.0 lenses
Please contact jeremykuzub@jufaintermedia.com for more details
How can I use one or more AurorEye units in a specific upcoming research campaign or proposal?
Please contact jeremykuzub@jufaintermedia.com